Before I found the nerve to start working on the Lord Elrond
costume, I decided to make the circlet. It was easy enough, looking at the
photos, and at some finished products other people have made and put up for
sale online.
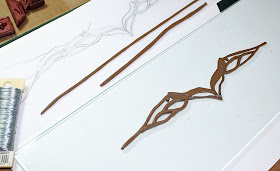
I figured that I could make the crown using polymer clay ,
but it would need to have an armature, or a wire skeleton, so that the clay
pieces don’t break. So, that’s what I did.
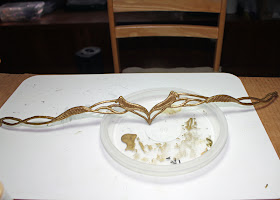
Because my toaster oven for baking clay was just that, a
toaster oven, a whole circlet would not fit in it. Therefore, I decided to make
the crown in three segments. I baked the three pieces, glued them together
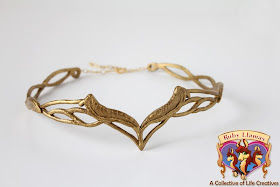
afterwards, and painted the crown with metallic gold acrylic paint.
The crown came out
very nice. I added a gold-colored chain that I found at Michaels. Looks
handmade, but serves the purpose, I think.


Did you use a flexible polymer clay?(Bake and Bend, or the like)or just "standard" bake polymer clay. It looked like you bent the pieces after the clay got cooked...so the clay would need to be able to handle the flexion.
ReplyDeleteYes, this is just standard polymer clay. The regular polymer clay is flexible if baked as thin strips. That's correct, I curved the clay after baking.
ReplyDeleteHow did you trace the pattern onto the clay?
ReplyDeleteAisvar, I use parchment paper and sketch the pattern with pencil. Then I lay the parchment paper over the clay and redraw the design, leaving a slight indentation of the design on the clay.
ReplyDeleteI have a suggestion to give it a more antique look you should brush it over with black paint and wipe it off with a paper towel. This will allow the crown to look like it has been worn over time due to normal wear and tear. Also the black paint will only seep into the small crevices.
ReplyDeleteThanks. Yes, I've done the black paint weathering technique with some of my crafts. Good suggestion. :)
ReplyDeleteDid you wrap the polymer clay around the wire then shape the pieces?
ReplyDeleteHeather, I cut shapes of the pieces then embedded the wire and added more clay to complete the forms.
ReplyDeleteomg you are amazing! ive been looking for this exact tutorial and i was so pleased to find your page. you did an AMAZING job on this your a true artist! if mine comes out even half a nice as your i will be so happy. Thanks again for taking the time to post this tutorial i greatly appreciate it!
ReplyDeleteThank you, Tiffany! You made my day! :)
ReplyDelete