March 27, 2012

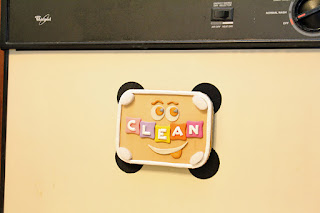
Dirty-Clean Dishwasher Sign

You know how you always wonder if the dishes in the dishwasher are still dirty or already clean? Our solution was to stick the corresponding post-it note on the door of the dishwasher. We had a "Clean Na" (clean already) and a "Dirty Pa" (still dirty) post-it that stays on the bulletin board until needed.

I got tired of managing and replacing the post-it note that sometimes fell on the floor (if not behind the water cooler), and got all crumpled, nasty, and unsticky. I thought I'd get creative and make a decent and real sign.

Because the front panel of our dishwasher from the 80s is plastic, a magnetic sign was out of the question. I had to design one that uses velcro as a fastener. And it has to be reversible and sturdy enough to withstand the constant reversing action. One side would be "CLEAN" and the other side "DIRTY".

I headed for my polymer clay workstation. Bluish grayish colors would work for the Dirty side, and bright whitish colors would be good for the Clean side. I cut an aluminum plate to serve as the backing and covered it with a thin layer of neutral brownish beige blended clay.


The letters had to be large and easy to read (and easy to make), so, arial-looking font was my default. Gray for Dirty, white for Clean.


I baked the letters and the backing first.


To make the sign more interesting, I designed sad and happy faces, and borders. I baked those elements next. Then I super-glued all the elements onto the backing, including the corner posts where the velcro-loop pieces would be attached.


And there it is. A reversible sign that snaps onto the velcro-hook pads I attached to the dishwasher. I threw away the post-it notes for the last time.


March 12, 2012

The Seven Roses Project

In Dec 2007, I bought a set of three bare-root roses from a warehouse store.


I planted them onto containers and wrote about How to Grow Bare-Root Roses in Containers at eHow. Eventually, I planted the pink one on the ground, beside our calamansi tree, but left the other two in their pots. I didn't fuss over them too much, the way a serious rose grower would, but I loved how every now and then I could bring in beautiful flowers from my own garden.


To celebrate spring this year, a local home improvement store offered shrubs on discount. The shrubs included hybrid teas and grandifloras. I couldn't pass it up -- I chose four.


This time I couldn't leave the roses in their pots because they would be harder to maintain than if I put them in the ground. So, now I had a project cut out for me.


I chose a sunny location in the front yard so that I'll see the plants all the time. With a plan in hand, I gathered the materials I would need to transfer six rose plants from their pots to the ground. I would need two bags of garden soil (they have organic ones now!), a bag of rose food, and concrete borders that matched the ones we already had.


I marked the area, peeled and rolled up the sod, and dug the holes one by one. Sounds easy when you say it like that, but that sentence took me three days in real life. And several pain relievers.


I enriched each hole with garden soil and rose food before I plopped the plant in (Florida soil is mostly sand). Then I positioned the borders and watered the entire plot.


Project complete!


The seven roses are: Intrigue (lavender), Queen Elizabeth (pink), Ambassador (orange), New Day (yellow), Scarlet Knight (red), Pristine (pale pink), and Eclipse (yellow-orange).