How did I get involved in this? My godchildren Oneal and Rej called my attention to the first photo releases of the Hobbit dwarves back in January when I visited Manila. They said they have decided to be Thorin (Oneal) and Kili (Rej) and wear the costumes when the movie opens at the end of the year. They showed me the photos and presented a challenge: "How do we make the scale mail?"
They posed this challenge the night I conducted a jewelry-making tutorial for them and their friends. One of my sessions was about how to make beads and pendants with polymer clay -- it was easy to conclude we could make the scale mail with polymer clay
So, as soon as I returned to Florida, I started working on the clay scales. The first thing I did was design clay replicas patterned from the different scales on Thorin's armor (later on, Kili's coat too). I baked those, and from them I pressed and baked fresh clay to create the negative molds.
The series of photos below shows how I use the negative molds to create the scales that will be painted and attached to the armor shirt that will be worn by Oneal.
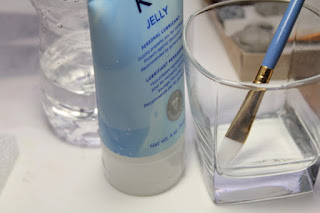
1. Prepare a "release agent" -- this prevents the raw clay from sticking to the negative mold. I use KY Jelly mixed with a little water (just to water down the jelly a bit).
2. Paint the release agent on the surface of the negative mold, making sure to reach all the crevices. Don't forget the edges -- the excess clay will stick to the edges if you miss them.
3. Condition a ball of polymer clay, just enough to cover the negative mold.
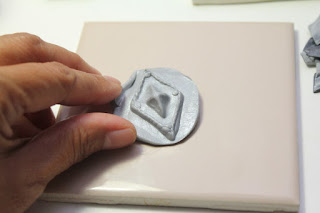
4. Press the clay onto the mold. The outside surface will become the back part of the scale, so it needs to be flat. Push the excess clay to the sides.
5. Gently pull out the fresh clay from the negative mold. Try not to tug too hard because the scale will get deformed. Lift the edges around the mold before pulling out the entire scale.
6. Lay the clay scale on a flat surface, preferably glass or ceramic. Gently adjust the clay if it got deformed in the pulling process.
7. Use a sharp blade to cut off the extraneous clay from the edges of the scale.
7. Bake the clay scales following manufacturer's directions. (I use Sculpey Premo and it bakes at 275F for at least 30 minutes.)
8. Let it cool down and paint as needed.
And there's the first batch of scales, already baked and ready for the painting phase.


13 comments:
Now I want to try making it myself! :D
I was just curious as to the amount of scales you made for each type and approximate dimensions for them. I definitely want to try your method out.
The number of scales will depend on the size of the person wearing the shirt. Large persons will require more scales to cover the sleeves and chest area. The dimensions also depend on the size of the person because if you're a small person, large scales will look awkward. I suggest you look at the online photos of Thorin and estimate the sizes of the scales based on the wearer. I pretty much just eyeballed it and did some trial and error. Good luck!
What clay did you use to make the molds and the final pieces? Im new to this and looking to try this out. Where can i find the tools used to get the detail work in the molds. Very well done!
For both the molds and final pieces, I used regular polymer clay that you will find in most hobby/craft stores. No special tools, just the regular ones you will also find where the clay is sold.
hi--would it be ok/safe to use petroleum jelly as a lubricating agent instead? if not, is there some mixture you can make instead?
I can't remember if I tried petroleum jelly. But it won't hurt to try. And see if there are no reactions after the baking process. Diluted KY worked for me, so I just kept using it. :)
Wasn't the chainmall shirt heavy with all those pieces on? :)
Hi Mia,
Yes, the shirt took on an additional 4-5 lbs. Relatively, it's lighter than if the scales were made of metal instead of polymer clay. :)
Very amazing!
How did you create the negatives?
Did you cut it with a knife into the clay?
Hi, I created the negatives by making positives first then molding clay over them and baking those to become the negatives, which is what I used to make the replicate multiple positive scales. :)
How much clay did it take to make this? I see 1 pound bars going for around 16 bucks on Amazon. Is this what ya used?
Hi Steve, I used the small 2-oz blocks and made sure I got them on sale. I averaged 15 scales per block, so roughly, I used up close to 1.5 lbs. It would definitely be more cost-effective to get the 1-lb blocks if you're committing to this project. Good luck!
Post a Comment