After close examination of the online photos of Thorin, we figured that the best material for the scale armor shirt is fleece. I confirmed with Oneal that while it looks very close to whatever material they used in the movie, fleece will be warm, and will add to the weight and heat factor of the total costume (which includes a tunic under the armor, and a hefty fur coat over it).
Oneal was okay with the fleece, so I went and bought some. Fortunately,
the material was discounted, and I got another discount for a little extra yard
that was the end of the bale. Now I have some extra black fleece for whatever
new project comes up.
The next decision point was the shirt style. Will it be a t-shirt
style that is worn by pulling it over the head? Traditional chainmaille and
scalemaille are worn that way – so that they protect the entire body. But
because we don’t intend to get into any kind of death-defying activities while
wearing the Thorin costume, we decided to design the armor shirt to be worn like a
lab gown – it opens in the back.
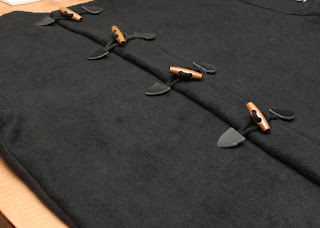
If it opens in the back, we must choose the closure method. Oneal said he would like to use toggles for the rustic look. He also said the
large toggles would be easier to manage than buttons. Velcro is an option but
toggles are way cooler. I found four at the crafts store.
The online photos show that Thorin’s scalemail attire actually includes
sections that protect the thighs, much like the “haidate” of the Japanese
armor. We agreed that rather than sewing a separate “skirt” to serve as the
haidate, we would just extend the length of the front of the shirt down to the
knees – that way the armor shirt-cum-skirt would be easier to put on. The
photos also show that the scales on the thigh protectors are only along the
edges.
Scales, fleece, toggles, and style ready, here are the steps for
making the Thorin Oakenshield armor shirt:
1. Get the exact body measurements from the wearer
of the costume. Make sure the measurements are for a shirt that would be worn
over a tunic – carefully measure around the armpit/armhole and the edge of the
sleeve, and across the chest. The rest of the numbers would be the basic essentials
for making a v-neck shirt (neck-to-shoulder blade, neck-to-waist, etc).
2. Cut the material according to the pattern,
leaving about half an inch allowance for the inside stitching.
3. Hem the edge of the sleeve. You will want to do
this before you attach the scales. (I had to use a heavy duty sewing
machine to work through the thick layer of folded fleece).
4. Lay the scales on the sleeve to get the big
picture. Attach each scale to the fleece with a strong adhesive like
cyanoacrylate (Super Glue).
5. Split and hem the skirt section. Arrange the skirt scales
following the design on the photos. Glue the scales to the fabric. Do the same
for the breastplate.
6. Hem the back panels and sew them onto the front
panels (connect the shoulders and sides). Attach the sleeves. I highly recommend pinning (better yet, handstitching with a running stitch) the sleeves to the body before feeding them into the sewing machine; otherwise, things will go out of whack. Plus, with the scales already glued on, it gets tricky maneuvering the sewing machine around the armhole. (I wondered if it would have been better to sew the sleeves to the body first, then glue the scales afterwards, but then it would've been more difficult to accurately position the scales for gluing.)
7. Attach the back closures. The leather anchors of the toggles are supposed to be sewn onto the fabric, but considering that would require some kind of precision using a heavy duty machine, the easier method is to superglue them on. Hand-sewing the cords to the fabric at
the junctions of the anchors reinforces the attachment.
Coming up next: photos of the finished Thorin Oakenshield armorshirt.


