This project was totally spontaneous. It cropped up when Mike saw a
Freddy Krueger rubber mask at the CVS store and decided to wear it for
Halloween. When he tried it on at home, he put on his cowboy hat to complete
the look. I said that if he really wants to complete the look, he needs to wear
a striped sweater and the Freddy Krueger glove! Thus, the project was born.
I scavenged through our closet for what I could retrofit into the
Krueger sweater. Nothing. Then I remembered that we had set aside some garments
for donation to the Salvation Army, and that’s where I found two old long-sleeved
shirts -- one brownish, one dark-reddish. Jackpot! This project is looking very
promising.
Now for the glove. I knew that Mike had leather work gloves that were
perfect for the prop. I asked him if he could give up the right glove for the project
(it will be totally appropriated for the costume so he will need to get new gloves
to have a viable pair). He had no choice, actually. Hah!
Next was research. I had to look for actual photos of the Krueger glove
because all I remember is there are four sharp knives protruding from the fingertips.
Luckily, someone had already done this project (in fact, a lot of people have already
done this!) and generously posted a pattern that could be printed on regular bond paper.
Very helpful – thank you!
At this point I had to make a decision. Will I follow the pattern and
use copper and aluminum sheets as well as actual knives? I figured that since a
ton of awesome folks have already recreated this prop using authentic materials,
I prefer to do my own thing with non-lethal substitutes. My substitute of
choice was Worbla thermoplastic sheets.
The Worbla is easy to cut and can be formed and manipulated using heat
(hot water, steam, oven, heat gun, hot iron, flat iron). The material becomes soft, like clay, and
hardens at it cools. When cool it's hard as, well, hard plastic. This was my first
time to work with it so this was a learning process for me.
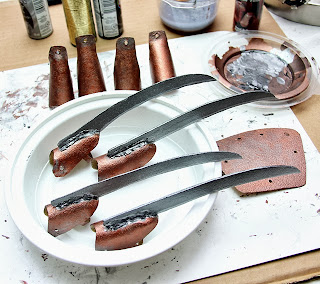
I started with the knives. Two layers gave the knife form the necessary
heft. But the thermoplastic material made them not rigid enough to easily pierce
through flesh, nor sharp enough to cut through anything. As long as they ended up looking like knives, they’re fine by me.
Then I cut the rest of the patterns and copied them onto the
Worbla sheets.
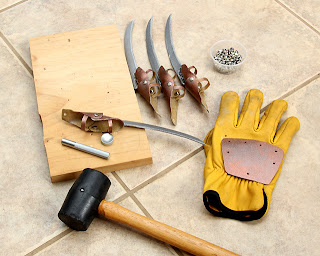
Using a heat gun and a metal pipe, I formed the finger plates one by
one. I used the back of a ballpeen hammer for rounding the fingertips, and a
hot iron with a pointed tip to make the holes for the rivets.
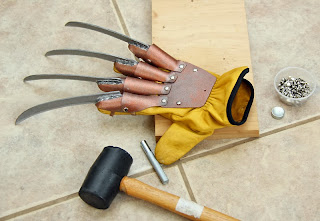
I attached temporary rivets to check the alignment of the finger
segments. So far, so good.
The next step was to attach the knives to the fingertip sections. I was
surprised at how easy it was to “glue” them together. The Worbla sheet is
integrated with a kind of adhesive, making it very simple to connect pieces to
one another.
To make the attachment points of the knives and the fingertip sections
look like the original metalwork, I had to add scrap pieces along the joints to
resemble solder marks. It’s interesting that using Worbla, you won’t need any
soldering, but because the glove has to look like the movie prop, I had to
simulate the solder joints.
Then there are the loops across the curved segments to keep the
contraption in place and give the user the ability to control the angle of the knives. Just
heat the tips of the strips and press them into place.
Painting is next. Some silver here, some bronze there, some dark
smudges here and there. Done!
I had to run to Michaels for another pack of rivets because I had used
up all the small ones for my Lord Elrond costume.
Included in the assembly is punching holes through the back of the hand of Mike’s work glove to coincide
with the holes on the main plate (following the printed pattern). The rivets on the back of the hand went through the finger appliance, the main plate, and the leather glove.
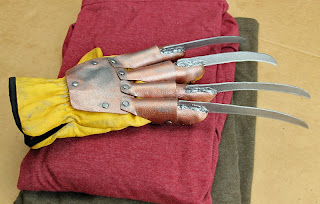
As a finishing touch, I added a few more dark smudges on the Worbla pieces as well as the leather
glove.
Last step: I asked Mike to do a final fitting, and yes, it works!
We’re just about ready for Halloween! Next up, the Freddy Krueger sweater.


4 comments:
hi, great glove, i decided to try this out for myself, i build metal ones but have always wanted to make a plastic one that looked better then the offical plastic ones. ive got some of this worbla and ive built my parts but i wondered how you managed to stick your plades to each other to make a double layer and how did you stick them to the tips? im new to worbla so i dont know everything about how it works. thank you
One side of the Worbla has an adhesive. When you heat a piece to soften, you can stick it on another piece very easily. That takes care of the layering and the attaching to the tip of the finger section.
oh right, i did try that last night and it did stick, sort of, but i could still pull it away quite easy. maybe it needs to be a lot hotter/softer
That's correct. Make them soft enough to meld with each other.
Post a Comment