April 27, 2012

Kitchen Tip: Store Salad Greens For Weeks

Those packages of pre-cut salad greens at the supermarket are pricey because you pay for the processing and the packaging. If you buy the greens in their original harvested form, at the farmer’s market or local grocery store, you will not only get the freshest veggies (next to harvesting from your own backyard) but also save some pocket money.

The challenge is how to keep the greens fresh in the refrigerator for the length of time it takes you to consume all of it. It’s not really a challenge because all you need are plastic bins, paper towels, and a propping device. 

I found the ideal plastic storage bins at a home improvement store. They serve the purpose because they are long enough to fit a whole romaine head and deep enough to fit an average green lettuce head.


Before I store the greens, I pluck out the compromised (bruised) leaves and rinse the heads to remove whatever sand and dirt are stuck in there. If the leaves are a bit limp, I soak the whole thing in water for about half an hour to revive them. Then, a gentle shake to remove the excess water and they’re ready for the bins.

Because contact with too much moisture promotes leaf decay, and the bottom of the bin is where the excess water gathers, I address that concern two ways: I put a double layer of paper towels to absorb the excess moisture in the bin, and I install a propping device over the paper towels to hold the greens away from the wet towels. For my romaine and greenleaf lettuce, I used a plastic packaging tray.


That plastic tray was originally the packaging tray of quail eggs that we bought at an oriental store. It was just what I had on hand; I could’ve used a stack of plastic spoons or a few sauce containers. I actually used several water bottle caps for my iceberg lettuce bin (I’m the Recycle-Repurpose Queen!).


The point is to slightly lift the greens from the bottom of the container to allow air circulation and minimal contact with a wet surface.

The bins are not air-tight (veggies need to breathe too) but they seal well enough to keep the greens from drying out in the fridge. Keeping them in their own containers also ensures they don’t get poisoned by the ethylene gas from certain fruits we also keep in the fridge.


But here’s my biggest reminder: make sure your refrigerator temperature is set no higher than 40 degrees F (4.4 degrees C); the wrong temperature will hasten spoilage.

Another tip: make sure the bottoms of the lettuce heads are facing the back of the fridge. Reason: it’s colder near the back wall of the fridge; leaf tips could freeze. 


April 24, 2012

Less Stain from Stainless Flatware

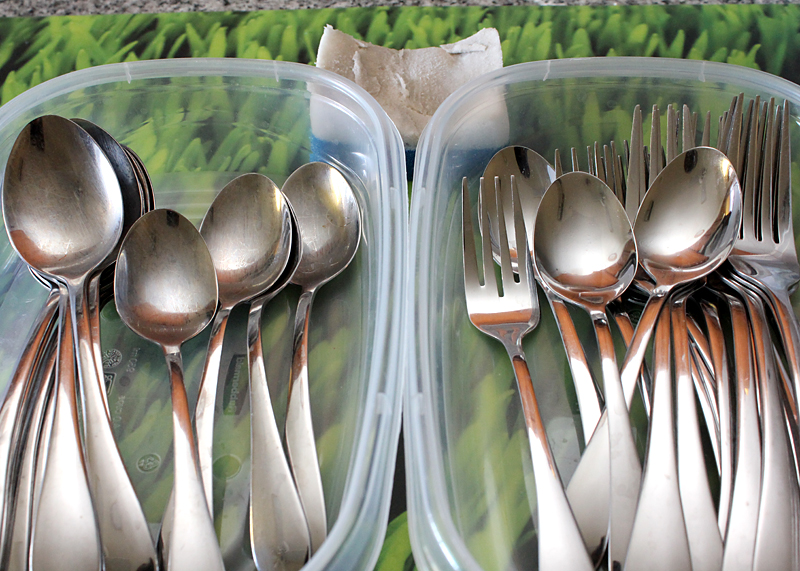
If you're anything like me, you toss your used flatware in the sink, then gather all of them in the dishwasher waiting for the appliance to be full enough to run a wash. Then after about a year, you notice that your once-shiny stainless flatware are all cloudy and cruddy. You try to remove the crud by hand-washing the spoons and forks with a sponge and dish detergent but the shine never comes back.


If you're anything like me, you try "The Eraser" because it can clean everything!

Then you hear yourself scream, "Whoa! Check this out!"

Yes, the all-around Eraser (available as Mr. Clean Magic Eraser and Scotch Brite Easy Eraser) is the answer.


Wet the pad, slide it over the flatware surface just a few times, and watch the spoons and forks become shiny and new again! Rinse with clean water and towel dry. Revive several sets of stainful stainless flatware in just a few minutes.

If you're anything like me.

April 8, 2012

Asking for Directions


I keep thinking about how we could've been more helpful. We were at a red light at an intersection near Seaworld. The guy driving the car next to us, apparently a tourist, rolled down his window and asked, "How do we get to Downtown Disney?"

After thinking quickly because the light was about to change, Mike said, "Go straight, take the ramp to I-4 West."

The guy repeated the instructions then the light turned green. Mike said to me as we drove away, "Well, he'll figure out that he has to go into the 67 exit, and find his way again."

Now I'm thinking, there were other ways to reply to the guy's question:

1. Speak real fast and say, "Go straight, take the ramp to I-4 West, take the 67 exit to Lake Buena Vista, then turn right to State Road 535, then turn left to Hotel Plaza Blvd, then turn left at Buena Vista Drive. Downtown Disney will be to your right. You want me to repeat that?"

2. Say, "Punch 'Downtown Disney' on your GPS and follow the voice prompts."

3. Say, "Use your phone's navigation app."

4. Say, "Google Downtown Disney."

5. Point to the 7-11 at the corner and say, "Go there and buy a map."

6. Resist the urge to say, "It's complicated" and straight-face fib, "We're not from around here. Sorry."

7. Raise an eyebrow, look at the traffic light, stare back at him, and say, "Seriously?"

On second thought, Mike's instructions couldn't have been more helpful. If the guy went up the ramp to I-4 West, he would've eventually seen all the huge signs, one of which is at the nearest exit that says "Downtown Disney".

Downtown Disney

March 27, 2012

Dirty-Clean Dishwasher Sign

You know how you always wonder if the dishes in the dishwasher are still dirty or already clean? Our solution was to stick the corresponding post-it note on the door of the dishwasher. We had a "Clean Na" (clean already) and a "Dirty Pa" (still dirty) post-it that stays on the bulletin board until needed.

I got tired of managing and replacing the post-it note that sometimes fell on the floor (if not behind the water cooler), and got all crumpled, nasty, and unsticky. I thought I'd get creative and make a decent and real sign.

Because the front panel of our dishwasher from the 80s is plastic, a magnetic sign was out of the question. I had to design one that uses velcro as a fastener. And it has to be reversible and sturdy enough to withstand the constant reversing action. One side would be "CLEAN" and the other side "DIRTY".

I headed for my polymer clay workstation. Bluish grayish colors would work for the Dirty side, and bright whitish colors would be good for the Clean side. I cut an aluminum plate to serve as the backing and covered it with a thin layer of neutral brownish beige blended clay.


The letters had to be large and easy to read (and easy to make), so, arial-looking font was my default. Gray for Dirty, white for Clean.


I baked the letters and the backing first.


To make the sign more interesting, I designed sad and happy faces, and borders. I baked those elements next. Then I super-glued all the elements onto the backing, including the corner posts where the velcro-loop pieces would be attached.


And there it is. A reversible sign that snaps onto the velcro-hook pads I attached to the dishwasher. I threw away the post-it notes for the last time.


March 12, 2012

The Seven Roses Project

In Dec 2007, I bought a set of three bare-root roses from a warehouse store.


I planted them onto containers and wrote about How to Grow Bare-Root Roses in Containers at eHow. Eventually, I planted the pink one on the ground, beside our calamansi tree, but left the other two in their pots. I didn't fuss over them too much, the way a serious rose grower would, but I loved how every now and then I could bring in beautiful flowers from my own garden.


To celebrate spring this year, a local home improvement store offered shrubs on discount. The shrubs included hybrid teas and grandifloras. I couldn't pass it up -- I chose four.


This time I couldn't leave the roses in their pots because they would be harder to maintain than if I put them in the ground. So, now I had a project cut out for me.


I chose a sunny location in the front yard so that I'll see the plants all the time. With a plan in hand, I gathered the materials I would need to transfer six rose plants from their pots to the ground. I would need two bags of garden soil (they have organic ones now!), a bag of rose food, and concrete borders that matched the ones we already had.


I marked the area, peeled and rolled up the sod, and dug the holes one by one. Sounds easy when you say it like that, but that sentence took me three days in real life. And several pain relievers.


I enriched each hole with garden soil and rose food before I plopped the plant in (Florida soil is mostly sand). Then I positioned the borders and watered the entire plot.


Project complete!


The seven roses are: Intrigue (lavender), Queen Elizabeth (pink), Ambassador (orange), New Day (yellow), Scarlet Knight (red), Pristine (pale pink), and Eclipse (yellow-orange).