December 8, 2012

Hobbit Costume Tutorial – Finished Thorin Scalemail

If you are joining us just now, here are my previous tutorials covering the phases of the creation of Thorin's scalemail armor:
1.       Hobbit Armor Costume Scale Mail Tutorial – Clay Scale


Finally, it’s time to show photos of the completed Thorin armor shirt.


First, an inventory photo of the handmade scales prior to attachment to the shirt. I made a total of 434 polymer clay scales, not including the trials and errors. For Thorin alone, that’s 116 for the sleeves, 110 for the breastplate, 98 for the thighs and belt. The rest are for Kili’s collar, baldric, and vambrace.
More than 400 armor scales produced.


Then, here are some production photos I did not include in the previous tutorials:


Gluing the scales on Thorin's sleeves.

Thorin's armor sleeves ready for assembly.

Trying on Thorin's scalemail armor sleeves.

Aligning the scales for Thorin's scalemail breastplate.

Front panel of Thorin's scalemail armor.

Closeup of Thorin Oakenshield's scalemail armor.

Added a smiley button to humor Oneal.

The completed Thorin Oakenshield scalemail armor shirt.


And here's Oneal wearing the armor the night it arrived in Manila:

Oneal Rosero (as Thorin Oakenshield) trying on the scalemail armor.


Yesterday, Oneal wore his Thorin character in a Geekfight event where his team won!


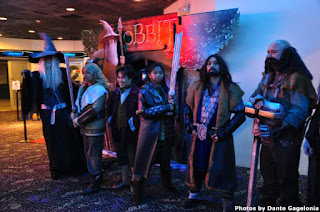
Thorin and the dwarves will make their grand appearance at the premiere of The Hobbit on December 14th. I will add photos here as they become available.

P.S. At the premiere:
Oneal and friends at the Hobbit premiere in Manila.

November 16, 2012

Hobbit Costume Tutorial - Sewing the Armor Shirt

We've created the scales and painted them, so now on to making the armor shirt.

After close examination of the online photos of Thorin, we figured that the best material for the scale armor shirt is fleece. I confirmed with Oneal that while it looks very close to whatever material they used in the movie, fleece will be warm, and will add to the weight and heat factor of the total costume (which includes a tunic under the armor, and a hefty fur coat over it).

Oneal was okay with the fleece, so I went and bought some. Fortunately, the material was discounted, and I got another discount for a little extra yard that was the end of the bale. Now I have some extra black fleece for whatever new project comes up.

Scales, fleece, toggle clasps for the Thorin scalemail armor project.

The next decision point was the shirt style. Will it be a t-shirt style that is worn by pulling it over the head? Traditional chainmaille and scalemaille are worn that way – so that they protect the entire body. But because we don’t intend to get into any kind of death-defying activities while wearing the Thorin costume, we decided to design the armor shirt to be worn like a lab gown – it opens in the back.

If it opens in the back, we must choose the closure method. Oneal said he would like to use toggles for the rustic look. He also said the large toggles would be easier to manage than buttons. Velcro is an option but toggles are way cooler. I found four at the crafts store.


The online photos show that Thorin’s scalemail attire actually includes sections that protect the thighs, much like the “haidate” of the Japanese armor. We agreed that rather than sewing a separate “skirt” to serve as the haidate, we would just extend the length of the front of the shirt down to the knees – that way the armor shirt-cum-skirt would be easier to put on. The photos also show that the scales on the thigh protectors are only along the edges.

Scales, fleece, toggles, and style ready, here are the steps for making the Thorin Oakenshield armor shirt:

1.     Get the exact body measurements from the wearer of the costume. Make sure the measurements are for a shirt that would be worn over a tunic – carefully measure around the armpit/armhole and the edge of the sleeve, and across the chest. The rest of the numbers would be the basic essentials for making a v-neck shirt (neck-to-shoulder blade, neck-to-waist, etc).


2.     Cut the material according to the pattern, leaving about half an inch allowance for the inside stitching.

Cutting fleece for the Thorin armor shirt project.

3.     Hem the edge of the sleeve. You will want to do this before you attach the scales. (I had to use a heavy duty sewing machine to work through the thick layer of folded fleece). 


4.      Lay the scales on the sleeve to get the big picture. Attach each scale to the fleece with a strong adhesive like cyanoacrylate (Super Glue).

Gluing scales for Thorin's scalemail armor sleeves.
  

5.     Split and hem the skirt section. Arrange the skirt scales following the design on the photos. Glue the scales to the fabric. Do the same for the breastplate.


6.     Hem the back panels and sew them onto the front panels (connect the shoulders and sides). Attach the sleeves. I highly recommend pinning (better yet, handstitching with a running stitch) the sleeves to the body before feeding them into the sewing machine; otherwise, things will go out of whack. Plus, with the scales already glued on, it gets tricky maneuvering the sewing machine around the armhole. (I wondered if it would have been better to sew the sleeves to the body first, then glue the scales afterwards, but then it would've been more difficult to accurately position the scales for gluing.)


7.      Attach the back closures. The leather anchors of the toggles are supposed to be sewn onto the fabric, but considering that would require some kind of precision using a heavy duty machine, the easier method is to superglue them on. Hand-sewing the cords to the fabric at the junctions of the anchors reinforces the attachment.

Toggles as closures for the Thorin scalemail armor shirt.

Coming up next: photos of the finished Thorin Oakenshield armorshirt.  

November 12, 2012

Hobbit Costume Scale Mail Tutorial - Painting

After the scales come out of the oven and cool down, they go to the painting table (which is also my molding table, sewing table, gluing table, and photoshooting table).

By the photos of Thorin that we gathered online, the scales are stressed metallic silver in color. While I created the scales using silver polymer clay, I would still need to paint over the clay to give it the stressed look. I made sure that the raw clay scales are light silver so that when I paint over them, the light silver will reappear after the "stressing" step.

I used water-based acrylic paint: metallic silver mixed with a little black. It's an easy two-step process:

1. Paint the entire scale (front and sides).

Handpainting the scales for Thorin's scalemail armor costume.


2. Slide the painted surface against a rag to wipe off the paint from the protruding portions of the scale, resulting in a "stressed" look.


The scale will then have an uneven coloring -- dark in the crevices, light in the protruding areas.

Scales for the scalemail armor of Thorin Oakenshield.Close-up of handmade scale for the Thorin scalemail armor costume.


Because the scales are small, they are best painted by holding them with bare hands. I tried using gloves but they get in the way. Besides, the acrylic paint that builds up on the fingers are easily washed off with soap and water. You'll just have to enjoy having zombie fingers for a little bit.

Painted fingers.


The next tutorial will be about attaching the scales and sewing the armor shirt.

October 13, 2012

Hobbit Armor Costume Scale Mail Tutorial - Clay Scale

A group of family members are costumers -- they put a lot of effort in building their attire and accessories as close as possible to the theatrical originals. They already have a lot of experience creating near-perfect replicas of costumes from Star Wars, Lord of the Rings, and other popculture favorites. Right now they are gathering forces again and this time gearing up some dwarves for the premiere night of The Hobbit in December.

How did I get involved in this? My godchildren Oneal and Rej called my attention to the first photo releases of the Hobbit dwarves back in January when I visited Manila. They said they have decided to be Thorin (Oneal) and Kili (Rej) and wear the costumes when the movie opens at the end of the year. They showed me the photos and presented a challenge: "How do we make the scale mail?"


They posed this challenge the night I conducted a jewelry-making tutorial for them and their friends. One of my sessions was about how to make beads and pendants with polymer clay -- it was easy to conclude we could make the scale mail with polymer clay .

So, as soon as I returned to Florida, I started working on the clay scales. The first thing I did was design clay replicas patterned from the different scales on Thorin's armor (later on, Kili's coat too). I baked those, and from them I pressed and baked fresh clay to create the negative molds.

Polymer clay molds for the scales of Thorin Oakenshield's scalemail armor costume.


The series of photos below shows how I use the negative molds to create the scales that will be painted and attached to the armor shirt that will be worn by Oneal.

1. Prepare a "release agent" -- this prevents the raw clay from sticking to the negative mold. I use KY Jelly mixed with a little water (just to water down the jelly a bit).

KY Jelly as release agent for the clay mold.

2.  Paint the release agent on the surface of the negative mold, making sure to reach all the crevices. Don't forget the edges -- the excess clay will stick to the edges if you miss them.


3. Condition a ball of polymer clay, just enough to cover the negative mold.


4. Press the clay onto the mold. The outside surface will become the back part of the scale, so it needs to be flat. Push the excess clay to the sides.


5. Gently pull out the fresh clay from the negative mold. Try not to tug too hard because the scale will get deformed. Lift the edges around the mold before pulling out the entire scale.


6. Lay the clay scale on a flat surface, preferably glass or ceramic. Gently adjust the clay if it got deformed in the pulling process.

Positive mold of scale for Thorin's scalemail armor costume.


7. Use a sharp blade to cut off the extraneous clay from the edges of the scale.


7. Bake the clay scales following manufacturer's directions. (I use Sculpey Premo and it bakes at 275F for at least 30 minutes.)


8. Let it cool down and paint as needed.

Polymer clay rendering of Thorin Oakenshield's scalemail armor costume.


And there's the first batch of scales, already baked and ready for the painting phase.


July 11, 2012

Turbo Tuna Dubliner Melt

This morning, I ran out of my comfort food (vienna sausage and scrambled eggs), so I had to improvise. I saw a can of tuna and I remembered how I used to like tuna sandwiches. Since I had all the ingredients on hand, with the Turbo Cooker at the ready, I decided to whip up a new comfort (ehem, healthy) food.

Let me share my quick and easy way to a Turbo Tuna Dubliner Melt on Honey Wheat:

Drain a can of Chunk White Albacore Tuna (Starkist Very Low Sodium seems to be my new favorite).


Toss with sea salt, freshly ground black pepper, chopped sweet onions, sweet pickle relish, and light mayonnaise (I'd put capers and chopped celery if available). Load tuna mix and a thick slab of Dubliner cheese on slices of honey wheat bread.


Turbo toast until cheese melts.


Slap warm slices together.


Enjoy with favorite greens on the side. Yum! Healthy comfort food.