August 4, 2013

The Hobbit: Lord Elrond Costume: Vambrace

While I had printed out an arm bracer pattern from a generous soul who posted it online, I still had to make my own, based on my son’s arm measurements. It should neither be too long nor too short, so I had to adjust the dimensions and curvature. The dress form was really helpful in providing perspective.

Paper patterns of the Elrond armor on the dress form.

I decided to use vinyl, attached to heat-shaped craft foam as the base where the plates would be attached.

Elrond vambrace using vinyl and heat-curved craft foam.

Elrond vambrace using vinyl and heat-curved craft foam.

When I was satisfied with how the paper pattern looked, I traced them onto the vinyl and cut the pieces out neatly.

Tracing the patterns of the Elrond vambrace plates onto the vinyl.

Elrond vambrace vinyl plates.

The next step was making the clay trim. I had estimated the total measurement of the silver edges on all the plates of the whole armor and came up with 900 feet of a quarter inch width of clay. That’s a long piece of clay. I tried freehand slicing but I couldn’t keep a steady hand to make the quarter inch width, so I devised a tool. I glued two pointed blades, a quarter inch apart, on some popsicle sticks. Voila!

Customized blades to cut the polymer clay into 1/4-inch strips.

And there are the bracer plates with the silver edge trim.

Clay edgings attached to the vambrace plates.

I hand-stitched a hard heavy-duty thread along the edges of the vambrace base just for effect.

Adding stitches to the Elrond arm bracers.

Then I needed to decide on how the bracers would be worn. I asked my son if he wanted buckles or laces. We agreed on buckles, which he could manage without help. So I went to the Tandy Leather store to get some buckles (for my purpose, these were the best ones they had, and I couldn't find any other source). Then I made my own closures with the same vinyl I used for the vambrace base.

Fabricating the buckle closures for the Elrond bracers.

Fabricating the buckle closures for the Elrond bracers.

The step that’s not pictured here is when I painted the plates with Mod Podge to make them shiny. I had tried various ways to make the vinyl shine, like polyurethane, white glue, and polymer clay gloss, but Mod Podge is the one that dried out the shiniest.

Then I punched holes and hammered studs to attach both the plates and the buckles simultaneously to the vambrace base.

Assembling the Elrond arm bracers.

Lord Elrond arm bracers finished.

Lord Elrond arm bracers finished.

And wow, it worked!

Lord Elrond arm bracers on the dress form.

Lord Elrond costume arm bracers (vambraces).


August 3, 2013

The Hobbit: Lord Elrond Costume: Armor Vest

Looking closely at the stock photo of the Elrond armor, I figured that there had to be some kind of vest underneath the chest plates that serve as anchor for the plates. That vest has a standing collar and extends to the bodice ending in a v-shaped waist. So this is what I imagined it would be.

Preparing the armor vest of the Elrond costume.

The vest has a swirl design on the bodice, so I drew some lines and traced them on a stabilizer material that I could follow on the sewing machine. I didn’t want to have to deal with sewing on the large vest material, so I decided to make the swirls on a bodice shape and then attach that shape onto the vest afterwards.

Making the swirl design on the vest of the Elrond costume.

The swirls would be embroidery lace, also known as soutache, which I thought I could find in brown. Sadly, all I could find was gold, so I painted the lace brown.

Painting the gold lace with brown textile paint.

Then I sew-traced the soutache onto the bodice shape.

Sewing lace on the vest of Elrond's costume.

Then I removed the stabilizer and attached the shape to the vest, and there it is.

Removing stabilizer material.

Swirl design on Elrond costume vest.

Swirl design on Elrond costume vest.

The next step was to attach the collar. I made the swirls first, then the silver piping (soft silver colored vinyl that I’ve had in my stash for a long time).

Preparing the standing collar of the Elrond vest.

Preparing the edging/piping of the Elrond armor vest.

Yes, thank you for heavy duty sewing machines. And metal clips. I wouldn’t have been able to attach the collar and piping any other way.

Attaching the collar to the Elrond costume vest.

Attaching the piping to tje Elrond armor vest.

And here’s the finished vest. Note that there’s a lot of scrap stabilizer material on the floor. The vinyl material is not sewing-machine-friendly – it sticks to the machine’s base plate and pressure foot. Solution: put stabilizer material under and over the vinyl surface; then gently tear the stabilizer off the sewn pieces. It’s tedious but it’s the only way to sew through the vinyl without specialized equipment.

Completed armor vest of the Lord Elrond costume.

August 2, 2013

The Hobbit: Lord Elrond Costume: Tunic

Having a dress form is imperative when you’re winging your way to building an all-new costume. You need lots of craft paper too. After receiving my son’s measurements (he’s halfway across the planet, so I was making a costume that he will get to try on only after I send it on a slow boat to Manila), I drew and cut the patterns.

Lord Elrond Costume pattern on the dressform.

Confident that I got all the measurements right, I cut the fabric. I had chosen a maroon jacquard fabric from the upholstery section of JoAnn Fabrics.

Tracing the Elrond tunic pattern to the jacquard material.

I made sure to fit the tunic-in-progress on the dress form that I had adjusted to my son’s measurements.

Testing the cut fabric on the dress form.

The sewn Lord Elrond tunic on the dress form.


While the tunic will remain hidden under the plate armor, I still thought it should have fancy buttons like the actual tunic that Lord Elrond wears in the halls of Rivendell. I set out to look for nice buttons but couldn’t find any that fit the costume. So I made my own, using polymer clay.

Handmade buttons made from polymer clay for the Elrond tunic.

This next photo was taken close to the completion of the project. I thought Lord Elrond wore harem pants (and I wanted to do that last), but upon close examination of the stock photo, I figured he wore a skirt. So, I made the skirt last and attached it to the waistline of the tunic.

The skirt underneath the tunic of the Elrond costume.


[Go back to Lord Elrond Costume Summary]

August 1, 2013

The Hobbit: Lord Elrond Costume: Prep

After the success of the costuming gig of my son’s friends at the premiere of The Hobbit: An Unexpected Journey, I started thinking, “My Thorin scalemail costume was a hit! Which Hobbit costume should I do next?”

I thought of making Nori, one of the dwarves, to help complete their roster, but when I asked my son if he would be okay wearing that costume, he wasn’t sure. I asked if he would rather be inside a helmet and armor, like maybe one of the elven guards. He replied, “If I’m going to be one of Elrond’s guards, I might as well be Lord Elrond.” And that was my go signal. The next costume project has been identified.

I googled all the images of Lord Elrond wearing the plate armor (there was only one stock image that was used to promote the movie, and Elrond appeared in the film in that armor for less than two minutes). With what was available, I diligently deconstructed the complex, layered costume so that I could wrap my head around the challenge. I tried to draw all the costume elements, figuring out how each piece would fit into the entire attire.

Lord Elrond costume deconstructed and sketched.


In determining the construction of the costume, my mandate to myself was to ensure that the attire would: (1) not maim my son, (2) be relatively easy to put on, and (3) stay intact for the duration of the costuming event (hopefully longer). Since I would be building everything from scratch, I had the freedom to choose the materials that approximate what they actually used in the movie.

Although the elven armor looks like sheet metal (which they probably forged for the movie), I wasn’t inclined to go that route. First, metal is expensive, and second, I’m not too hot on taking a crash course on metalsmithing just to make this costume (maybe next time). Ergo, I hopped around town to gather fabric (for the tunic and cape) and my chosen substitute for metal: marine vinyl.

Materials for Lord Elrond's costume.

My next challenge was figuring out how I would construct the silver trim along the edges, as well as the swirl designs, of all the plates of the armor. I tried sewing a silver piping. I tried gluing all sorts of silver ribbons. I tried strips of foam. I tried foam paint. I tried hot glue. I tried paint effects. Nothing worked. I took a breather.

Trying out what works in constructing Lord Elrond's costume.

I thought I should try to make a pattern for the pauldrons (shoulder armor). I said that if I could make the pauldron shapes look like the movie version, I’ll be good. I cut some paper, and I attached it to my dress form. It looked okay. I could do this.

First paper pattern of the pauldron of Lord Elrond's costume.

Then suddenly it dawned on me. I could do the edge trim, as well as the swirl designs, using my favorite medium: polymer clay. So I cut some vinyl using the paper patterns, molded some clay, and put them all together into a prototype. It worked!

Prototype pauldron of Lord Elrond's costume.

Ruby with elven ears, inspecting the Elrond pauldron prototype.

Pauldron prototype for Lord Elrond's costume.


So I decided to get as much clay as I could. When Michael’s put the Premo clay on sale for $1 each, I picked up all the silver ones from the three stores near our place.

Premo Sculpey Polymer Clay for the trim and swirl designs of Lord Elrond's costume.

I was ready.

Note: this next photo was taken after the costume was completed, but I will post it here now, to show the tools and accessories I used for the project. It doesn’t show the heavy duty sewing machine and the toaster oven (for baking polymer clay).

Tools, materials, and accessories used to create the Lord Elrond costume.

July 31, 2013

The Hobbit: Lord Elrond Costume: Circlet

Before I found the nerve to start working on the Lord Elrond costume, I decided to make the circlet. It was easy enough, looking at the photos, and at some finished products other people have made and put up for sale online.

Internet photo of Lord Elrond with circlet/crown.

I figured that I could make the crown using polymer clay, but it would need to have an armature, or a wire skeleton, so that the clay pieces don’t break. So, that’s what I did.
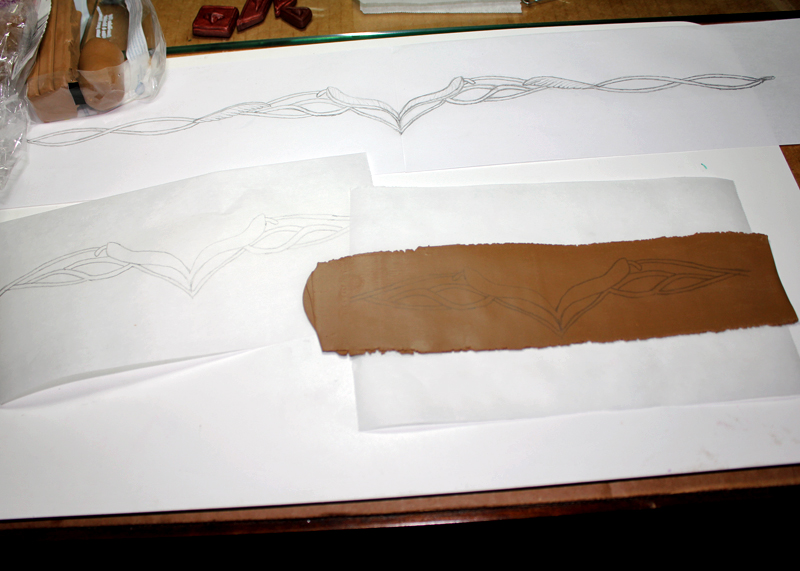
Circlet sketch and polymer clay medium.

Polymer clay form with wire skeleton.

Because my toaster oven for baking clay was just that, a toaster oven, a whole circlet would not fit in it. Therefore, I decided to make the crown in three segments. I baked the three pieces, glued them together afterwards, and painted the crown with metallic gold acrylic paint.

Elrond circlet clay form ready for baking.

Elrond circlet painted with metallic gold acrylic paint.

The crown came out very nice. I added a gold-colored chain that I found at Michaels. Looks handmade, but serves the purpose, I think.

Lord Elrond Circlet.

Lord Elrond Circlet handmade by Ruby Bayan.