All the hard work crafting the Hobbit-themed costumes come down to this: the Manila premiere screenings (Dec 9 & 10, 2013) of The Hobbit: Desolation of Smaug. I present the attires and costume elements that passed through my production worktables. [Click on the images for higher resolution.]
Lord Elrond's full costume worn by my son, Dante.
These next photos were taken at the advance screening for the New Zealand Embassy in Manila.
Here are the costumes that incorporate my contributions: Thorin's scalemail armor, belt buckle, and toecaps; Fili's leather vest; and Kili's accent (collar/vambrace/baldric) scales.
My bragging rights:
Showing posts with label Thorin Oakenshield. Show all posts
December 11, 2013
September 6, 2013
The Hobbit: Thorin Oakenshield Boot Caps
Another Thorin Oakenshield costume accessory I determined I could also
do was his boot caps. Fortunately, there’s a good image of them available
online.
Because I would again be making these accessories for Oneal, who’s
several thousand miles away, I asked him to take comprehensive measurements of his boots to where the
caps would attach. He was quick to illustrate his numbers.
Based on Oneal’s measurements, I came up with a paper pattern of what I
figured would be the best way to execute the angular forms of the toe tips.
There would be a two-section top panel, and a four-section side-to-side panel with tabs
to glue the top panel on.
The caps would be made out of a type of cardboard called chipboard – the
kind used as backing for sketch pads. I’ll cut the dwarven designs from craft
foam, glue them onto the chipboard, and paint the caps to look just like in the
movie. It was relatively straightforward.
I added a tiny strip of foam along the outer edges and gave the chipboard a
base paint of light brown. Then I superglued the cutouts in place.
This is how the caps looked on my husband’s biker boots (two sizes bigger
than Oneal’s) before the painting phase.
I used a combination of gold, silver, bronze, and black acrylic paints to give
the caps the semi-metallic weathered look.
Not bad. I’m a little uncomfortable though, at how the caps look a little too
shiny compared to the movie version. I told Oneal to maybe add another layer of
matte brown and some more weathering (maybe beat them up some) to make them not
look like they came from Lord Elrond.
September 4, 2013
The Hobbit: Thorin Oakenshield Belt Buckle
It only made sense that after building Thorin’s armor vest for Oneal, as
well as the scales that decorated his massive belt, I should also make the belt
buckle. It shouldn’t be difficult. Or so I thought.
Because I used polymer clay
in building the scale mail, I decided to also use clay in building the buckle. Just make it look like metal, just like the
scales.
So, I asked Oneal (from halfway across the planet), to give me the
width of his belt, which would be the basis for my design dimensions for the
buckle. And this is what I came up with.
Following the design, I formed and cut my metallic silver clay. It was
looking good but I had a tough time keeping the clay’s sharp corners. Every
time I add something, my fingers nudge what’s already in place and I have to go
back and do damage control.
Then I tried to make the clay surface look rough by texturing with a
crochet doily. It worked to some extent.
I guess I was too excited to put the whole thing together, including
the jewels, that it was only after I had baked the clay that I noticed that the
entire thing was off-kilter. The angles were wrong, the depths were wrong,
everything was wrong! And crooked! And it was just horrendous! It looked like an Autobot emblem that melted
under the sun. I junked it.
Not to be discouraged, I thought of using a different medium. The clay
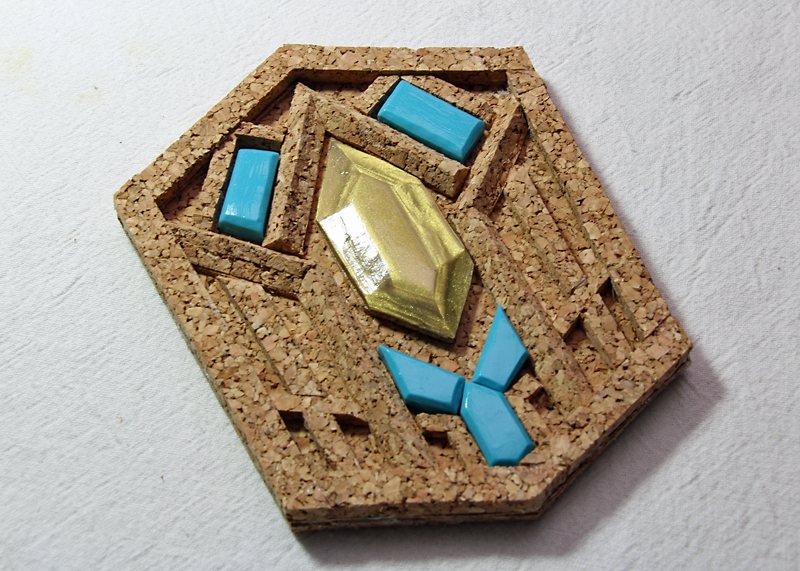
was just too malleable. I needed a medium that keeps its shape. Cork!
I adjusted the design a little bit, incorporated the backing, and used
a 45-degree cutter (tool for picture frame matting) to make the sharp-edged
shapes in the center of the buckle. It took a bit of practice (and a lot of
cork) to perfect the triangular-edge forms.
Next, the jewels. I didn’t like how the clay ones came out -- even after I tried to make
them shine with a couple of coats of Mod Podge.
It was time to employ my resin casting skills! I cut the jewel shapes
on hard (black) foam, then I pressed each one on a silicone mold. When the mold
cured, I poured some resin, which I tried to color with blue food color. The
food color didn’t blend well with the resin because there are tiny blue spots
in the cast, but it turned blue enough to pass for Thorin's buckle's precious jewels (you won’t
see the spots unless you look really close).
My next challenge was to design a way for Oneal to attach the buckle to
the belt that he has out there, twelve time zones away. I thought of suggesting superglue (he won’t really have to remove the
buckle from the belt, right?). But what if he wants to change the buckle to one
that says “Elvis”? So I thought of just screwing an aluminum sheet plate to the
back of the cork buckle, with tabs that he can bend and fold around his belt for a
perfect fit. (Note that I had to insert/glue onto the cork a set of dowels to screw the plate on.)
Adding a few shades of metallic silver acrylic paint made the cork look
very close to the movie version Thorin buckle. Glue the jewels on and… done! Now doesn't that look so much better than my clay *fail* attempt? But hey, you never know
until you try.
Yes, I know, it's still not an exact match to the movie version, but I bet if I try a third time, I'll get it just right!
December 8, 2012
Hobbit Costume Tutorial – Finished Thorin Scalemail
If you are joining us just now, here are my previous tutorials covering the phases of the creation of Thorin's scalemail armor:
1.
Hobbit Armor Costume Scale Mail Tutorial – Clay Scale
Finally, it’s time to show photos of the completed Thorin armor shirt.
First, an inventory photo of the handmade scales prior to attachment to the shirt. I
made a total of 434 polymer clay
scales, not including the trials and errors. For Thorin
alone, that’s 116 for the sleeves, 110 for the breastplate, 98 for the thighs
and belt. The rest are for Kili’s collar, baldric, and vambrace.
Then, here are some production photos I did not include in the previous tutorials:
And here's Oneal wearing the armor the night it arrived in Manila:
Yesterday, Oneal wore his Thorin character in a Geekfight event where his team won!
Subscribe to:
Posts (Atom)