Showing posts with label food. Show all posts

September 7, 2014

Why Spaghetti Should Be Assembled at the Table

Many years ago, I was criticized for serving spaghetti un-assembled. “Uncooked” was the word used – because I brought my spaghetti to the table with the noodles not mixed with the sauce. I had always served it this way but since that comment, I conformed by mixing everything in the pot, at the stove.

Today, I decided to go back to my old way of serving spaghetti: the noodles are in a bowl separate from the meat sauce, with cheeses and peppers at the ready.


As I enjoyed my freshly-assembled personal portion of spaghetti, I was taken back to why I had always done it this way before. Here are my reasons for going back to assembling spaghetti at the table (after years of doing it the other way): 
  1. The noodles don’t suck up the sauce. When you mix the sauce and the noodles in the pot, the noodles absorb the sauce, so that by the time the dish reaches the table, the pasta is past the al dente stage.
  2. You determine the sauciness of your spaghetti portion. Do you want it dry-ish? Or soupy? Maybe you want more sauce than meat? More meat than sauce? You’re in control here.
  3. Your spaghetti meal can be your own creation. More cheese? Some hot pepper flakes? Sweet like the Pinoy spaghetti? Garlicky? With anchovies? You can whip up your own tasty concoction – you don’t have to be content with what the cook considers his masterpiece.
  4. Leftover already-mixed spaghetti is not very appetizing. After refrigeration, the sauce is dry and the noodles are too soft and fat. If the refrigerated sauce is separate from the noodles, you can reheat it to its original state. You can reheat the noodles with a little hot water, on the stove or in the microwave. Assemble at the table and you’ll forget that they’re leftovers.
So, do come by for my spaghetti. You know what to expect. Bon appetit! 

June 17, 2014

How to Freeze Grapes for Smoothies

Grapes are a staple in our morning smoothie because their sweetness neutralizes the “green” taste of the veggies. I chose to use frozen grapes to cool the smoothie just right. After a few trials and errors, I discovered the best way to freeze them.

The first thing I do is wash the bunch of grapes. Then I pick each grape from the vine so that I won’t have to deal with the stems later on. I roll them on a paper towel to dry them. Then I grab a colander and arrange them very nicely in one layer.

Freezing grapes in a colander.

Then I place the arrangement in the freezer. The colander helps freeze the grapes evenly and quickly. After a few hours, I transfer the grapes to a container that will reside in the freezer until all the fruits are consumed.


Frozen grapes for smoothies.

I don’t bother to put the frozen grapes in a zipper bag because they don’t last too long in the freezer anyway -- in about a couple of weeks, they’d have all been added to our smoothies. Every morning, I just quickly grab a handful to add to our drink.

Of course, I’ve tried freezing grapes in bunches – stems and vines together. But when I’m picking the fruits to put in my smoothie, I have to fumble with pulling out all the frozen little stems, and in the early hours of the morning, I don’t particularly appreciate cold fingertips.

I’ve also tried freezing individual grapes on a baking sheet and in a plastic container. They work fine but I find the colander trick the neatest yet. 

June 7, 2014

How to Slice Cantaloupe into Chunks

I remember growing up detesting one and only one dessert fruit – the cantaloupe.  In the Philippines, we call it melon (accent on the “lon”). Somehow I couldn’t tolerate the taste and texture, and I didn’t know why.

Then a friend convinced me to try the melon juice – sweetened cold water infused with melon flesh delicately grated from the fruit using a tool that creates long orange “worm” strips (I’ll write about that next time).  After I enjoyed that wonderfully refreshing and tasty drink, the cantaloupe and I became buddies.

Here in the US, cantaloupes are available in groceries as whole fruits, shrink-wrapped slices with the skin on, and chunks in clamshell containers. Naturally, they are most expensive when already prepared bite-size, ready to eat; the price of a small bowl of chunks is sometimes higher than that of a whole fresh harvest fruit.

So, whenever I feel prudent, I ignore the chunks, grab a whole fruit, and set my mind to slicing the cantaloupe myself. It’s really quite easy. Let me show you.

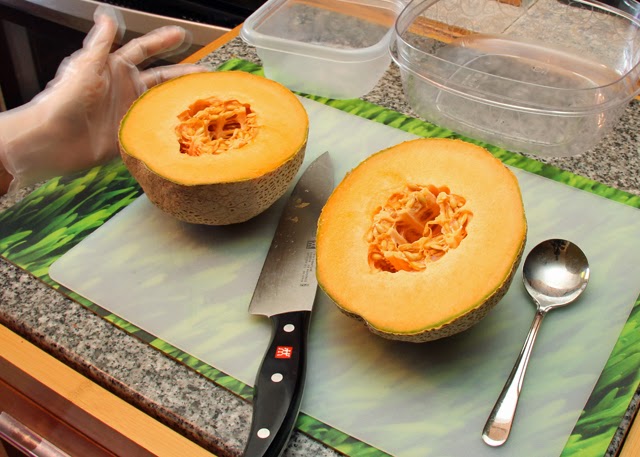
1. Get a whole cantaloupe. You will know it’s ripe and sweet when the skin is starting to get wrinkly and the fruit is giving off a sweet aroma. Grab a cutting board, kitchen knife, spoon, container for the seeds, and container for the chunks.  


Get a whole cantaloupe.

2. Slice the fruit in half. It doesn’t matter if it’s lengthwise or crosswise, because the fruit is generally round. I prefer to slice crosswise, but that’s just me.

Slice the cantaloupe in half.

3. Scoop out the seeds and fibrous material from the core of the fruit.

Scoop out the cantaloupe seeds.

4. Lay the half on the cutting board like an upside-down bowl. Slice off the skin by working from the top and down the sides.

Peel off the skin.

Peeled cantaloupe.

5. Make vertical cuts, about an inch wide, across the skinned half fruit.

Slice the cantaloupe.

6. Follow with 1-inch perpendicular cuts to create chunks. They won’t be the same sizes but you can follow-up with quick cuts to make the big chunks smaller.

Slice the cantaloupe into chunks.


Slice the cantaloupe into chunks.

Et voila! Bon appetit!

Cantaloupe chunks.


June 4, 2014

How to Slice Watermelon into Chunks

I grew up feasting on watermelon the old-fashioned way: sinking my teeth (and face!) into a freshly sliced wedge of that crunchy, cool, and juicy fruit (it’s also a vegetable) with its sugary-sweet nectar dripping down my chin, neck, and elbows! Slurp!

When I moved to the States, watermelon became a delicacy, presented as chunks sealed in clamshell packs at the supermarket. You need to use a fork (or tiny skewer) to eat it. Where’s the fun in that?

But yes, forking watermelon chunks makes sense these days because sticky hands don’t go well with our ubiquitous handheld devices. The downside of buying prepared watermelon is you pay a premium for the labor and packaging.

How about saving a bundle by buying a whole watermelon and spending a few minutes slicing it into chunks? I promise, it only takes a few minutes and you’ll have a big bowl of chunks you and your friends can conveniently fork into while you’re playing video or board games!

Let’s start.

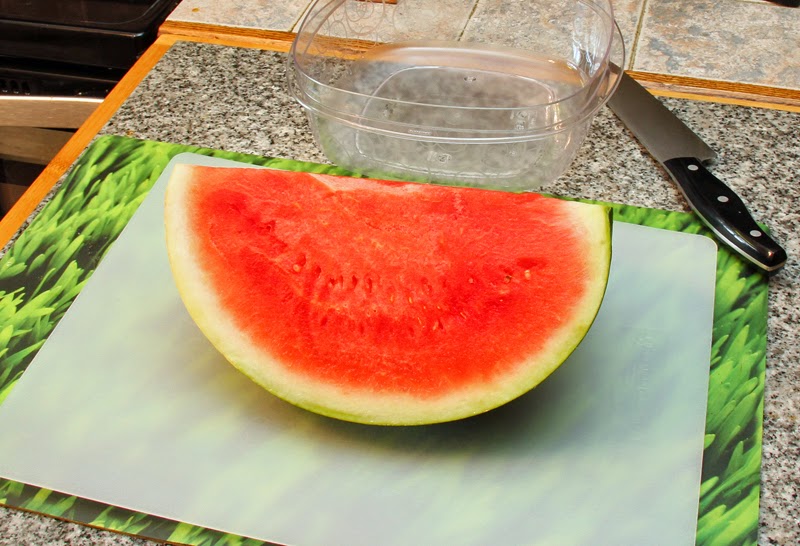
1. Buy a whole watermelon – the cheapest option. It’s going to be heavy, so plan ahead. If you won’t cut the entire fruit into chunks, you will need space in the fridge to store the uncut portion.

Watermelons

2. Slice the watermelon into quarters (some places sell watermelon quarters – you see the flesh and you don’t have to deal with a huge fruit). Work with a quarter at a time, unless you’re ready to consume the prepared chunks within 3-5 days (they get soggy and taste weird after a week).

Slice watermelon into quarters

3. Lay the quarter with the skin on top, away from you – it makes for easier, more stable cutting rather than if the skin were underneath. Trust me I’ve tried it all sorts of ways.

Slice watermelons into chunks

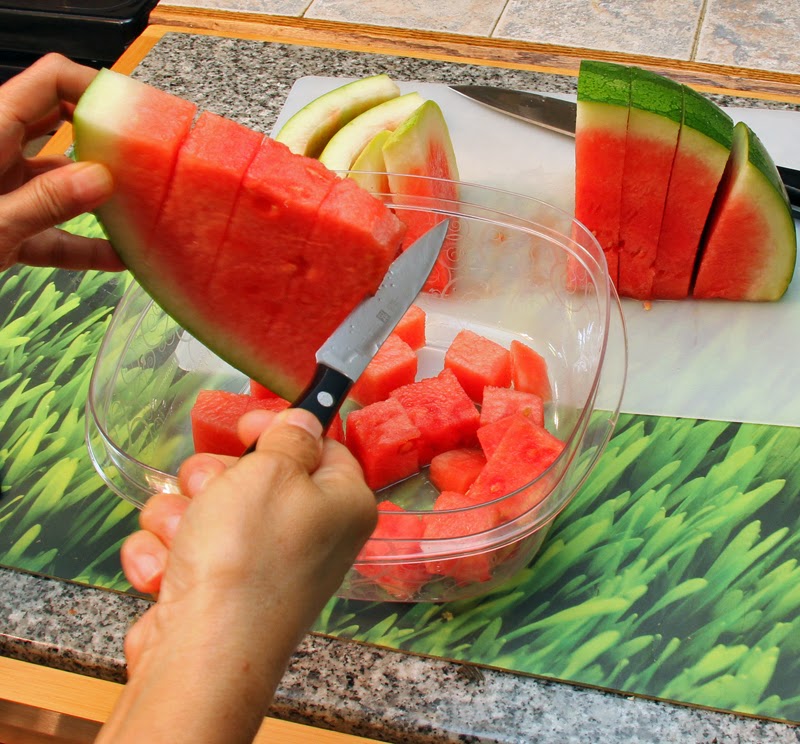
4. Make vertical cuts about an inch thick. Use a large kitchen knife to help with cutting through the skin. When done, switch to a paring knife and ready the container for the chunks.

Slice watermelons into chunks

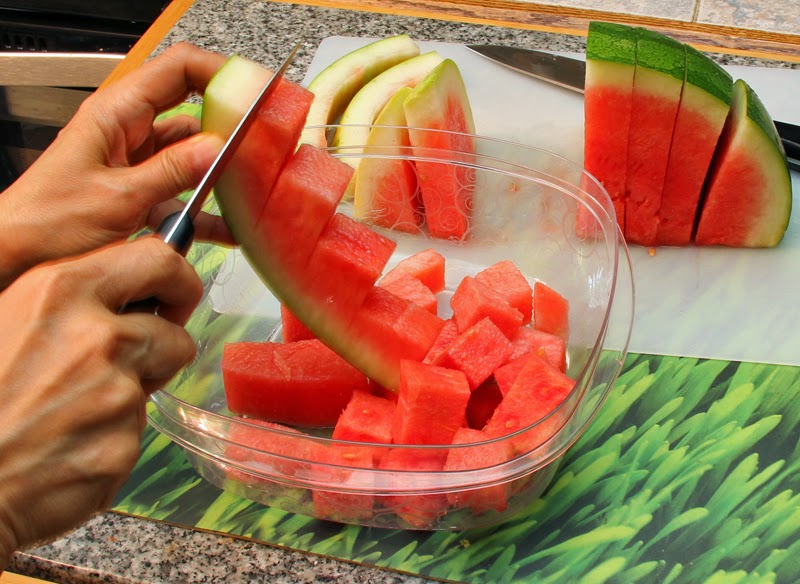
5. Pick up a slice and cut the flesh vertically about an inch thick, down to where the flesh meets the inside of the skin.       

Slice watermelons into chunks

6. Make perpendicular cuts, also an inch thick, letting the chunks drop into the container.

Slice watermelons into chunks

Slice watermelons into chunks

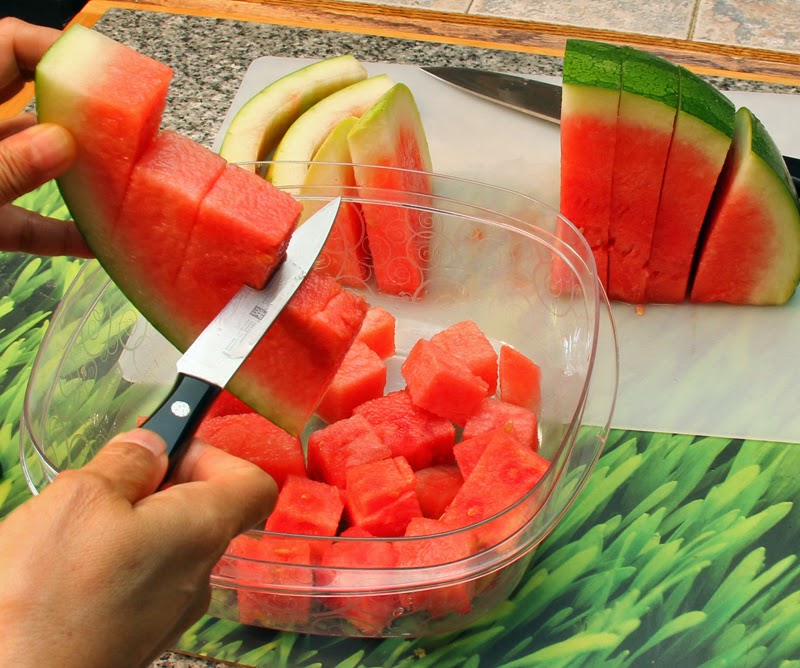
7. Cut off the remainder of the flesh by running the knife from the top to the bottom of the slice, along the edge of the skin. Be careful not to nick your fingers!

Slice watermelons into chunks

Slice watermelons into chunks

Do the same with the rest of the slices, and there you have it. Look at how much a quarter of a regular watermelon yields! And no sticky chin!

Watermelon chunks


May 26, 2014

How to Slice Pineapple Into Chunks

Pineapple season is here, and the “fruit,” which is actually a mass of berries growing along the bromeliad’s stalk, is once again popular in all grocery produce sections. It’s time to talk about how to slice them.

Born and raised in the Philippines (the top pineapple producing country in the world), I grew up with little appreciation for any kind of fruit juice other than pineapple. I also learned how to peel and cut pineapples without wasting any of the sweet and juicy flesh.

I’ve seen two convenient ways to prepare pineapples. One is to use a pineapple corer/slicer that cuts into the pineapple with a rotating blade and leaves the core and the skin behind. Another is to pare off the skin thick enough to include the “eyes” leaving a clean flesh for slicing. Both ways are quick and easy but wasteful because a lot of the delectable flesh is discarded in the process.

Here’s how I was taught to prepare a whole fresh pineapple into bite-size chunks without being wasteful [quick tip: wear plastic gloves to protect your hands from the acidic juices of the pineapple]:

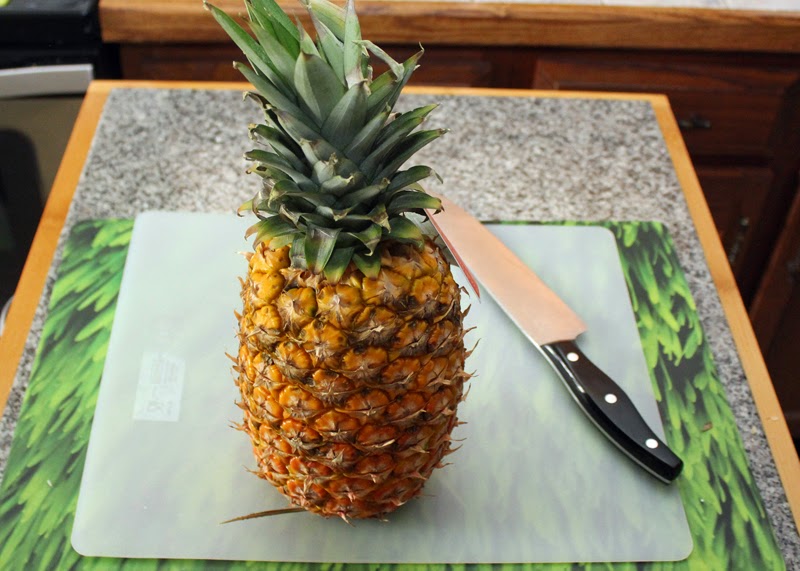
Del Monte Pineapple

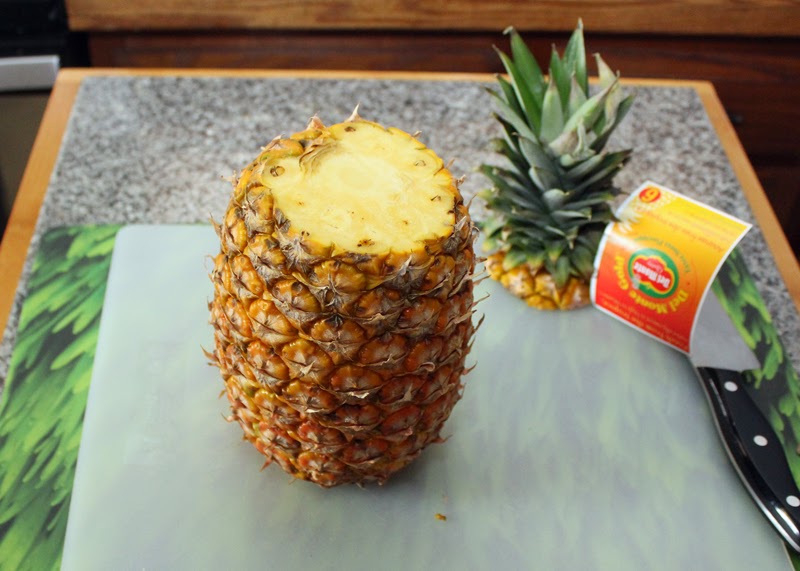
1. Slice the top off.  [Consider planting this top in your garden. It will take a couple of years before you can harvest your own one pineapple from it, which will most likely not be as big nor as sweet as what you could get from the grocery, but it’s always cool to say you grew your own!] Slice the bottom off too.

Pineapple - slice the top off.

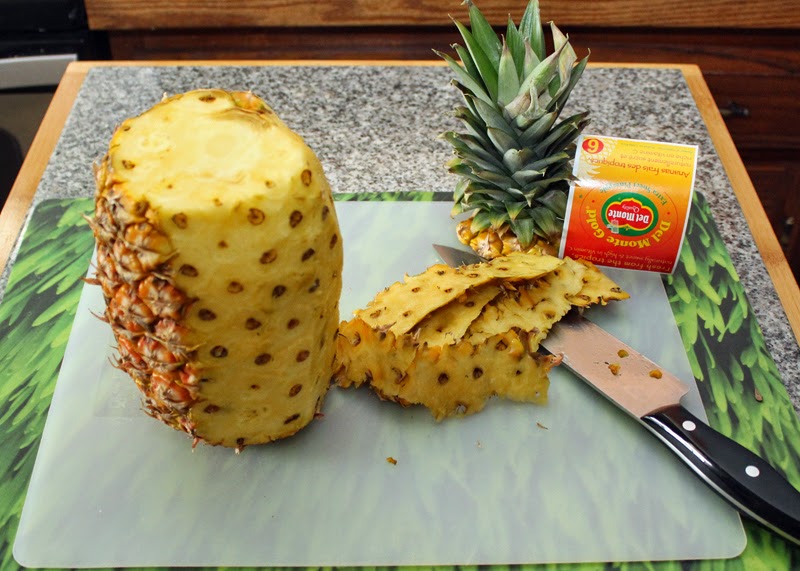
2. Cut away the skin just thin enough to expose the flesh. Parts of the “eyes” should still be on the fruit. You can skin the pineapple in a spiral or horizontally – I prefer to skin vertically.

Pineapple - cut away the skin.

3. Following the spiral pattern of the eyes, cut along the sides of the eyes to take them out. You can run the knife with one long spiral cut on one side of the eyes, from the top of the pineapple to the bottom, then a matching spiral cut on the other side of the eyes to scoop out the whole length. I usually work with two to three eyes at a time.   

Pineapple - take the eyes out.

Pineapple - take the eyes out.

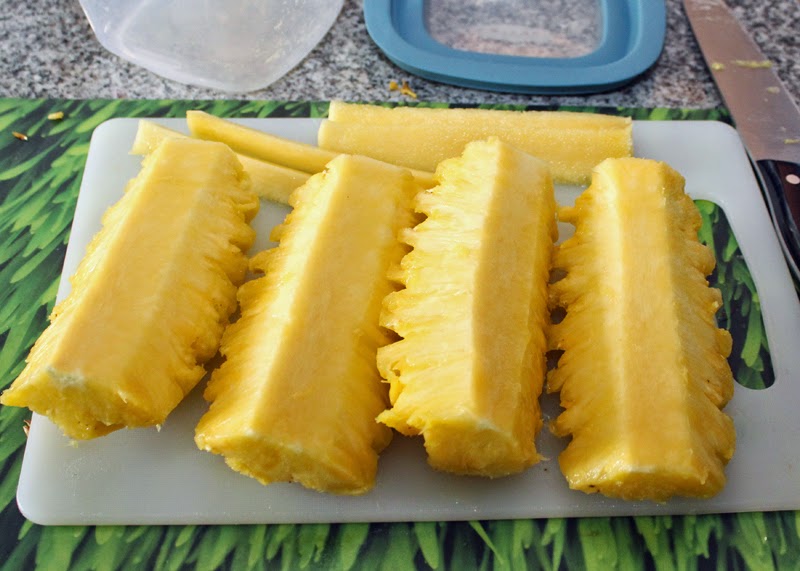
4. Quarter the pineapple lengthwise and cut out the tough core. [Some folks who are into juicing don’t discard the core.]

Pineapple - quarter.

Pineapple - slice off the core.

5. Halve each quarter lengthwise. Cut into bite-size pieces and enjoy!

Pineapple - slice lengthwise.

Pineapple - cut to bite-size pieces.


I enjoy my fresh pineapple chunks as is, with some salt or sugar, to flavor water, or as an ingredient of our breakfast smoothie. How do you enjoy yours? 

May 19, 2014

Breakfast Smoothie For Two

Our new massage therapist introduced us to the concept of taking raw fruits and vegetables first thing in the morning. While she was actually telling us about juicing, Mike and I decided that we would rather go with blending (aka smoothies). Juicing reduces the fruits and vegetables into liquid form, hastening absorption by the digestive system; blending chops and grinds the whole food, letting you consume the beneficial fiber of the fruits and vegetables.

After I did more research on the benefits and process of juicing and blending, I became more convinced that I prefer smoothies over juice. Besides, juicers are costly and harder to clean compared to blenders.

Our therapist suggested only three ingredients for the breakfast mix: carrots, cucumbers, and beets. She said that by taking these, first thing in the morning, we will not only become healthier but also feel better.

Because my research opened my eyes to this healthy sipping of plant nutrients, I thought: why not add what we’ve always known to be nutritious too, like celery, lettuce, spinach, ginger, and parsley? To neutralize the earthy taste of the beet root, I added strawberries, grapes, and banana. Nuts would be a great source of protein, so I threw in some chopped almonds. Then I read about the omega-3 and antioxidant properties of flaxseed, so I ground some and added that to our mix.

Breakfast Smoothie Ingredients

Breakfast Smoothie before blending

Sometimes I would vary the combination – oranges instead of strawberries, apple instead of banana. Sometimes the liquid would be no-sugar grape or apple juice, sometimes plain water. Most times I would add an infusion that we drink throughout the day: filtered water with slices of lemon, cucumber, and ginger (this one I learned from a friend who has been taking the infusion to keep her weight down).

Infused Water with Lemon Cucumber Ginger

Every morning, for the past 35 days, Mike and I have been having this smoothie for our first breakfast. To make the mixture refreshingly cool, I sometimes use frozen carrots, grapes, and strawberries, then throw in a couple of ice cubes. Some folks suggest frozen bananas or mixed berries.

Breakfast Smoothie before and after blending

Fruit and Vegetable Breakfast Smoothie for Two

So far, Mike and I appreciate the sipping of raw fruits and vegetables in the morning. It gives us a nice kickstart to our day. And with it, we’re already assured of ingesting at least two of the required number of servings per day. That’s certainly better than the “whenever” we were used to.

Here’s a quick list of what I include in one tall mug of our breakfast smoothie:
  • 5-7 sticks baby carrots (could be frozen)
  • 3-4 slices cucumber
  • 2 medium stalks celery
  • 2 thin slices ginger (more than that and the ginger taste dominates)
  • 1 thin slice beet root (makes the smoothie red)
  • 1 grab-full mixed greens (spinach, chard, lettuce, arugula, frisee, radicchio)
  • 1 small bunch parsley
  • 1 medium to large strawberry
  • 5-7 medium grapes (frozen is cool)
  • ½ ripe banana
  • 1 tablespoon crushed almonds
  • 1 tablespoon ground flaxseed
  • Ice cubes after blending
Other ingredients to try soon:
  • kale
  • broccoli
  • romaine
  • cantaloupe
  • mango
  • avocado
  • walnuts
  • cashews
  • chia seeds
  • blueberries
  • raspberries
  • blackberries
Why don't you try it? Then tell me how it goes.

June 9, 2013

Pirate Party Food Labels

The task was to make food labels for the dishes that would be served at a pirate-themed birthday party for a two-year old. The boy’s mother gave me a list of 11 food names that she already made up. The list included Dead Man’s Fingers (hotdogs), Cannonballs (meatballs), Salty Bones (pretzels), Parrot Wings (chicken wings), and Treasure (colored pasta salad).

Pirate Party Food Labels: Parrots Wings, Treasure, Catch of the Day

Of course, the first thing I did was Google pirate party food labels to get an idea of what others have created. And because the boy had been a huge fan of Jake and the Neverland Pirates, I tried looking for images I could use. Thank you, Internet, for the pictures! (Actually, Disney encourages pirate parties. Check out their "Planning a Pirate Party" page.)

So, here are the steps in making the pirate food labels that graced our birthday boy’s pirate party.

1. Gather all the images. Google and right click to “save image”. Jake and the Neverland Pirate images are available online in high resolution versions. Choose the skull-and-bones image to use for the flags. Pick a scroll image to use as the background of the text. Search for free fonts and pick a pirate type, then download so that you can use it on your image manipulation application (like Photoshop).

2. Arrange, size, and print your images. Print a sample and complete one prototype food label before making an entire batch.

3. Prepare the tools and materials: Barbecue sticks, olive skewers (snip off the sharp ends), black colored paper, adhesive tape, fancy scissors (wavy is good for the pirate theme), regular scissors, double-sided tape (or glue), hole puncher.

4. Print your images on regular bond paper.
Print out from online images.

5. Cut the labels and colored paper then tape (or glue together) to make the banners.
Pirate banners from barbecue sticks.

6. Punch the holes at the ends of the printed scrolls.
Punch holes on the scroll design.

7. Cut the skull-and-bones images into little flags and tape them onto the barbecue sticks.
Make tiny pirate flags.

8. Tape a barbecue stick onto the back of a banner.
Assemble the pirate party food labels.

9. Slide an olive skewer through the holes in the banner (this adds dimension to the banners), and secure the skewers with a small piece of tape to prevent them from slipping off.
Tape the barbecue stick and olive skewer to the banner.

And there you have it! 
Pirate party food labels.

Pirate party food labels.


Pirate party food labels: Ship n Dip, Salty Bones


Pirate party food labels: Sea Wrap and Dead Man's Fingers

Be creative in making up pirate names for the foodstuff you will serve at the party. Enjoy!

10/10/15 Update: I see that a lot of people come to my blog to check out these pirate party food labels. If you want me to make a set for you, please email me: rubybayan@gmail.com so that we can discuss. Please note that I am currently based in Manila. :)

May 19, 2013

Turbo Corn on the Cob


I used to cook corn unhusked in boiling water. Then we acquired a turbo broiler. I thought, if I can grill meat in the broiler, it makes sense that I can grill corn there too. Since then, I have never cooked corn any other way. Now our corn on the cob treats are juicy, tasty, and so addictive.

Here are the steps to cooking the best corn on the cob: 
  1. Purchase raw corn ears that look fresh. Avoid those that have dried husks. Peek into the husks to check that the kernels are plump and not drying out.
    Fresh raw corn
  2. Cut off the tips to remove the hair and the back ends. You might want to use a cleaver to chop off the back end – I twist the scissors around the base of the corn until the stalk is severed enough to allow me to break it off.
    Cut off tips of corn husk.

  3. Place them in the turbo broiler and set the temperature to 450 degrees F. 
    Place corn in turbo broiler.

  4. Cook for 20 minutes.
    Bake corn for 20 minutes.

  5. Enjoy!
    Enjoy juicy, tasty corn on the cob.

Remember: Corn is healthy food. It's what you add to the corn (salt, butter, cheese, mayonnaise, catsup, maple syrup, bacon, pot roast, full rack of ribs, etc.) that makes it unhealthy. Truth.