Showing posts with label sewing. Show all posts

October 18, 2015

Captain John Hart Costume Project


Oneal is back with another costuming project for me. He is attending a Dr. Who theme wedding and wants to go as Captain John Hart from the spinoff “Torchwood.”

I asked, “Who?”

He said, “Yes.”

I asked again, “Captain Who?”

He said, “No, Dr. Who. Captain John Hart.”

Before I could open my mouth again, he showed me the online photos of Captain John Hart. He said that’s the jacket he wants to wear to the wedding. 

Captain John Hart of Torchwood

Oneal said he will look for a jacket of the same color and texture and I can just convert it. Add the braid and buttons accessories, and adjust the collar and sleeves.

Easy as pie. If he can bring me the jacket (so I won’t have to make one from scratch), I’ll do the required renovations.

The search for the jacket took a few weekend trips to where jackets are sold. Remotely, he consulted with me on the options he found.


Oneal searching for the right jacket.

One had black sleeves, one looked like salmon, one looked like eggplant. We agreed on the maroon corduroy. I could make it work.

Next was the search for the braid material, or technically, the soutache. And the brass buttons. After total fails at several sewing stores, he landed at Carolina’s where they had these fancy options:
  
Searching for the right soutache.

Since it was going to be a wedding anyway, we agreed to use the white one with the silver trim (but without glitter or crystals). Here’s our messaging about the soutache and buttons.


He ended up buying a whole roll of the soutache (60+ feet) and the store's entire stash of gold buttons (a dozen more than we needed).

With all the materials available, I went to work. Digging through the sewing accessories I hauled from the US, I determined that the best way to work with the soutache is with a sticky stabilizer and fusing tape. Keeping an eye on the reference photo, I estimated the size and shape of the area the soutache will cover and cut a paper pattern.

Materials for the Captain John Hart chest braid.

This part required a lot of patience but the result was remarkable!

Making the Captain John Hart chest braid.

The next step was to sew the soutache onto the jacket. Two straight lines for now, just to hold the panel in place. Final stitching will be done after the fitting.

Sewing the soutache onto the jacket.

Oneal went searching again, this time for dark blue corduroy material that I will use for the sleeves and collar. But his search was a bust, so I said, “How about I use a blue microfiber that I have in my fabric stash? I will show you.”

This was the jacket Oneal tried for a final fitting. Just a few buttons, and pins all over the place.

Captain John Hart jacket in pins.

The jacket passed the fitting.

Captain John Hart jacket project Before-and-After.

Achievement unlocked!

Here’s Oneal at the wedding, with his wife wearing the project in my next blog entry.

Oneal at the Dr. Who theme wedding as Captain John Hart.

April 20, 2015

Upcycled Pot Holders

When you realize that you didn’t pack pot holders when you relocated from the other side of the planet, you quickly make some by repurposing a couple of face towels that you did pack a lot of.  

To make the pot holder different from the face towel, I decided to hand-sew the seams, creating a pocket to slip the hand in. And I hand-embroidered these: “POT HOLDER” and “PAN HANDLER.” Catchy.
Problem solved.


Pot Holder and Pan Handler

Pot Holder and Pan Handler

Pot Holder and Pan Handler

Upcycled Face Towels

Upcycled Face Towels

Upcycled Face Towels

January 8, 2014

Dice Pouch Project

The challenge was to make several pouches for an assortment of board game dice. The pouches would be given away as tokens to fellow gamer friends. The options for the material to use were paper, netting, suede, felt, or any kind of fabric that would serve the purpose. Nothing too fancy; after all, the pouch just needed to hold seven regular-sized dice.

After pulling out a number of drawers of materials I could use, I remembered that I had scrap leather from an old jacket I bought at a garage sale. It’s genuine leather that has natural wear and distress. And even though the scrap pieces are relatively small sections, they would be just fine for the size of the pouches. This was what I had been waiting for -- the chance to recycle/repurpose that old leather jacket!

I went ahead and made a prototype – two sewn-together panels with holes for a pair of drawstrings. It came out really nice!

Dice Pouch Prototype

Leather Dice Pouch Prototype

Because the scrap leather had been in storage, I decided to give each section a good cleaning. We keep a bottle of leather cleaning and polishing solution for our boots, bags, and other leather goods – I put it to really good use!

After the clean-up and polish, I traced the pouch panel pattern on the leather. Because the leather’s wear patterns were not uniform, I made sure that the paired panels came from the same swatch or were at least similar in discoloration. While scissors were good for the panels, the rotary cutter was most efficient for cutting the drawstrings.

Leather dice pouch pattern

Punching the holes was next.

Leather dice pouch punching holes

Then I just sewed the panels together, smooth side in, and pushed the seam to flip the panels smooth side out. It’s with projects like this that I’m glad I have a heavy duty sewing machine.

Leather dice pouch sewing

What I like about leather is you don’t need to worry about the edges fraying -- construction of the pouches was quick and trouble-free.

What took the most time was threading the drawstrings. A crochet hook would help, but I discovered that a pair of tweezers made the job pretty easy.

And here are the leather pouches, ready to be filled with dice. Mission accomplished.


Leather dice pouch batch

August 8, 2013

The Hobbit: Lord Elrond Costume: Cape

What’s a Lord without a cape? This particular elven lord wears a royal-red one what flows sleekly with every stride. I found a bright maroon microsuede fabric at JoAnn’s on sale. Three yards was more than enough for my son’s height. The pattern was easy, just a straight cut with a slit for both arms.

My challenge was how to make it sit on the shoulders squarely and still lie flat behind the neck no matter how tightly the armor vest is worn. My solution was a garter/elastic strip along the back of the neck, and snaps to attach the cape to the shoulders of the vest.

I had to hand-sew the gather on each shoulder and use hot glue to attach the vinyl strip that would have half of the snap. I attached the other half of the snap onto the shoulder of the vest.

My mistake was I didn’t look to see if I had a brown elastic band, which I had. It would’ve been less obvious than the white one I used (and I was too tired to re-do it).

Lord Elrond cape with elastic and snaps.

Here’s a photo of the snap solution.

Lord Elrond cape with elastic and snaps.

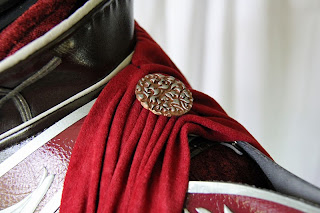
I made a couple of medallions using polymer clay. I pressed the raw clay on a round metal pendant that had swirlies. After baking, I painted it with silver, then bronze acrylic. I superglued the brooch pin hardware to the underside so that I could attach it to the cape. Later on, I made the medallions shiny with Mod Podge.

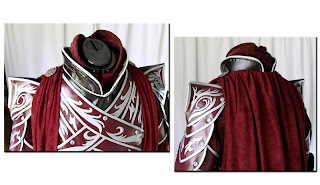
Lord Elrond cape completed.

And this is the finished cape on the dress form. It works!

Lord Elrond cape completed.

Lord Elrond cape completed.


August 3, 2013

The Hobbit: Lord Elrond Costume: Armor Vest

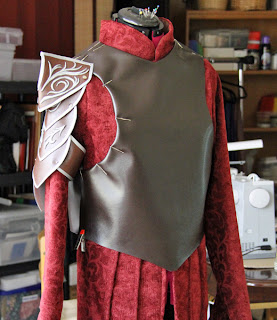
Looking closely at the stock photo of the Elrond armor, I figured that there had to be some kind of vest underneath the chest plates that serve as anchor for the plates. That vest has a standing collar and extends to the bodice ending in a v-shaped waist. So this is what I imagined it would be.

Preparing the armor vest of the Elrond costume.

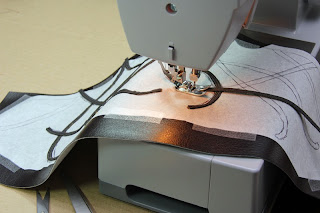
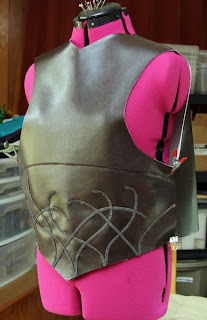
The vest has a swirl design on the bodice, so I drew some lines and traced them on a stabilizer material that I could follow on the sewing machine. I didn’t want to have to deal with sewing on the large vest material, so I decided to make the swirls on a bodice shape and then attach that shape onto the vest afterwards.

Making the swirl design on the vest of the Elrond costume.

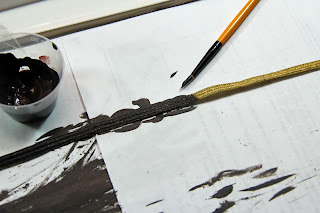
The swirls would be embroidery lace, also known as soutache, which I thought I could find in brown. Sadly, all I could find was gold, so I painted the lace brown.

Painting the gold lace with brown textile paint.

Then I sew-traced the soutache onto the bodice shape.

Sewing lace on the vest of Elrond's costume.

Then I removed the stabilizer and attached the shape to the vest, and there it is.

Removing stabilizer material.

Swirl design on Elrond costume vest.

Swirl design on Elrond costume vest.

The next step was to attach the collar. I made the swirls first, then the silver piping (soft silver colored vinyl that I’ve had in my stash for a long time).

Preparing the standing collar of the Elrond vest.

Preparing the edging/piping of the Elrond armor vest.

Yes, thank you for heavy duty sewing machines. And metal clips. I wouldn’t have been able to attach the collar and piping any other way.

Attaching the collar to the Elrond costume vest.

Attaching the piping to tje Elrond armor vest.

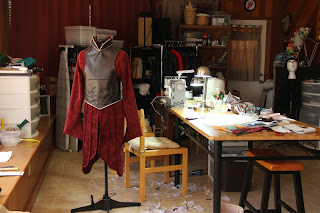
And here’s the finished vest. Note that there’s a lot of scrap stabilizer material on the floor. The vinyl material is not sewing-machine-friendly – it sticks to the machine’s base plate and pressure foot. Solution: put stabilizer material under and over the vinyl surface; then gently tear the stabilizer off the sewn pieces. It’s tedious but it’s the only way to sew through the vinyl without specialized equipment.

Completed armor vest of the Lord Elrond costume.

August 2, 2013

The Hobbit: Lord Elrond Costume: Tunic

Having a dress form is imperative when you’re winging your way to building an all-new costume. You need lots of craft paper too. After receiving my son’s measurements (he’s halfway across the planet, so I was making a costume that he will get to try on only after I send it on a slow boat to Manila), I drew and cut the patterns.

Lord Elrond Costume pattern on the dressform.

Confident that I got all the measurements right, I cut the fabric. I had chosen a maroon jacquard fabric from the upholstery section of JoAnn Fabrics.

Tracing the Elrond tunic pattern to the jacquard material.

I made sure to fit the tunic-in-progress on the dress form that I had adjusted to my son’s measurements.

Testing the cut fabric on the dress form.

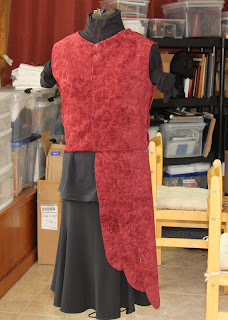
The sewn Lord Elrond tunic on the dress form.


While the tunic will remain hidden under the plate armor, I still thought it should have fancy buttons like the actual tunic that Lord Elrond wears in the halls of Rivendell. I set out to look for nice buttons but couldn’t find any that fit the costume. So I made my own, using polymer clay.

Handmade buttons made from polymer clay for the Elrond tunic.

This next photo was taken close to the completion of the project. I thought Lord Elrond wore harem pants (and I wanted to do that last), but upon close examination of the stock photo, I figured he wore a skirt. So, I made the skirt last and attached it to the waistline of the tunic.

The skirt underneath the tunic of the Elrond costume.


[Go back to Lord Elrond Costume Summary]

January 8, 2013

Repurposing a Star Wars Bag

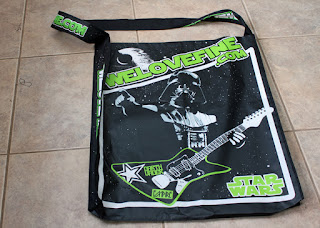
At the Star Wars Celebration VI last August, WeLoveFine.com gave away humongous bags for the t-shirts they sold. You buy one t-shirt and you get this gigantic tarp-material bag that you end up carrying around like a billboard.

WeLoveFine.com's Star Wars Bag at Celebration VI

Not a bad advertising gimmick. For tall people. I had to tie a knot on the handle so that I could carry it over my shoulder without the bottom dragging across the floor. Over the four days of the convention, I ended up taking more than one of these large bags home.


I couldn't see myself having the need to reuse these bags as bags, so I thought, why not repurpose them into aprons? When dismantled (rip out the stitches), one bag yields two panels, a strip that used to be the handle, and another strip that held the two panels together.


It was just a matter of cutting a panel to the shape of an apron and cutting the strips to however long the apron strings need to be. I used a serger machine (a zigzag stitch on a regular sewing machine works too) to clean up and secure the edges, and a few quick sewing stitches to attach the apron strings.


Apron made from WeLoveFine.com's bag from Star Wars Celebration VI

And there it is: a Star Wars tarp-material apron courtesy of WeLoveFine.com. (The second panel is in my "to do" pile.)