Showing posts with label home. Show all posts

October 31, 2015

Autumn Leaves Lamp Project

“We need a lamp over this coffee station,” my husband said back in 2003. Rather than run out to a home improvement store, I took it on as a DIY challenge.

I did a quick inventory of my crafts materials stash and decided I would use the fall leaves I had gathered from the Blue Ridge Parkway, North Carolina, the previous autumn season. Three types of big maple leaves will be excellent for the lamp design I had in mind.

This was the lighting solution I created back then, hung above our apartment’s coffee station. It served as a task light as well as a mood light for our nighttime activities.

Autumn Leaves Lamp over coffee station

Our apartment’s wall décor evolved over the years, but the lamp remained a fixture.

Autumn Leaves Lamp over coffee station

When we moved to our new home in 2007, the lamp became a nook light in the living room.

Autumn Leaves Lamp as a nook light

Autumn Leaves Lamp as a nook light

In 2009, we transferred it from the living room to the bedroom, where it became our nightlight until we moved overseas in early 2015.

Autumn Leaves Lamp as a nightlight

Because it would be impractical to ship the lamp halfway across the planet, and getting rid of the leaves was out of the question, I decided to dismantle the lamp and transport the three leaf panels.

Last week, at about the same time I picked up these fallen maple leaves 13 years ago, I built the lamp again. It hangs in its new location in our bedroom, to continue to serve as our nightlight for many more years.    

Autumn Leaves Lamp as a nightlight

Here’s a quick overview of how I made the leaf lamp:

Each pressed leaf is white-glued between plain white tissue paper and a transparent sheet protector. This sandwich is framed in cardboard, folded so that there’s a 2-inch tab to elevate the leaf panel from the base. Slip-in tabs attach the panels to the baseboard without adhesive.

Autumn Leaves Lamp leaf panels

Autumn Leaves Lamp

The baseboard is a sturdy recycled cardboard folded and taped to form a box-frame that’s hollow in the back. I cut slits on the baseboard to coincide with the slip-in tabs of the leaf panels.

Autumn Leaves Lamp baseboard

The first time around, I used crumpled gold gift wrap to cover the cardboard base. This time I painted the baseboard with a metallic bronze shade to jibe with the brownish leaves.

Autumn Leaves Lamp baseboard

The electrical elements are the basic wire, switch, plug, sockets, and lightbulbs. The lighting setup uses the traditional parallel wiring. The electrical is taped to the back of the box-frame, with each light sticking out through the cardboard base, centered behind each leaf.

Autumn Leaves Lamp electricals

Autumn Leaves Lamp lights

Autumn Leaves Lamp

These autumn leaves have been with us since the fall of 2002. And it looks like they will stay with us for much longer. That’s rather impressive.


April 24, 2015

Cardboard Spice Rack #3

When you move into a new place, you don’t always have the amenities you’re used to. In my case, our new residence has no spice rack. Nowhere to organize my spices! It does have a blank wall above the sink, which is the only open space available in our very conservative condo-type kitchen area. I figured it’s the best place to install another handcrafted cardboard spice rack (I had created two before – one for our old small apartment in Orlando, another for a friend).

I have an inordinate (wow, “inordinate”) amount of cardboard, aka moving boxes, so this simple shelving project would make a teeny tiny dent on my stash.


Measure the wall, estimate the spice container sizes, cut up the cardboard, fire up the glue gun, splash on some leftover paint, and there it is: my third cardboard spice rack of all time.


Recycled cardboard project

Preparing the spice rack frame

Painting the spice rack

Mounted cardboard spice rack.

December 20, 2012

Machine Embroidery – Exploratory Phase

The first time a saw an automatic embroidery machine do its thing, I thought it was magic! That was many years ago, when magic was beyond my reach. Fortunately, technology helps things along, so now the machines have become affordable. When Mike asked me what I wanted for Christmas, I said I wanted magic!

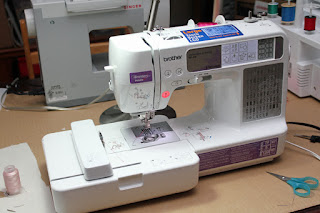
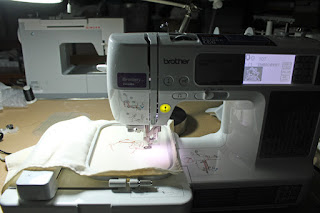
Since the Brother SE400 Enthusiast arrived a couple of weeks ago, I have been marveling at what it can do. (Follow the link to the Brother site for the product features.)

Brother SE400 Enthusiast


I was so excited that I quickly got extra bobbins and two types of stabilizers. 

Stabilizers and bobbins.

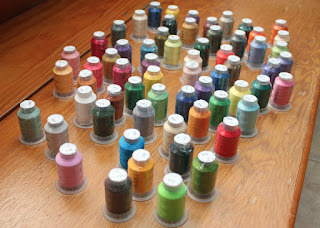
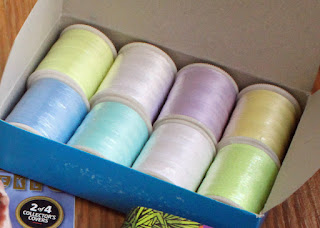
I also bought a ton of discounted embroidery thread from eBay.  I got the 63 Brother colors, a glow-in-the-dark set, and even an all-purpose fancy colors pack. And a rack too.
63 Brother Embroidery Thread Colors.

Glow-in-the-Dark thread.

Spools of embroidery and all-purpose thread.

All-purpose thread.


I know how to sew, but I guess I was just so fascinated with the automatic embroidery that on my second design I didn’t notice that the thread had snagged – it tugged on the needle as it embroidered, then I heard a *snap* and the machine stopped cold. I had to use pliers to pry the broken tip from the bobbin case.

Broken needle.

Then, when I worked on my third design, I didn’t notice that the cloth had folded under the holding frame, so the machine stitched over two layers of material. Duh.

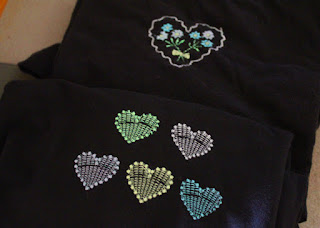
Tiny hearts.

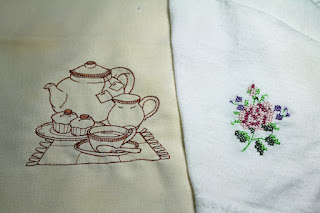
Of course, I had to try the monogram function on a face towel. It worked. Now I know I have the capability to make monogrammed whatever projects as gifts and giveaways. Ha!

Monogrammed face towel.

And here are the black t-shirts I embroidered with glow-in-the-dark thread. Not bad for a first try embroidering on t-shirts. (I figured from the frumpy results that the sticky back stabilizer is essential for t-shirt embroidery.)

Glow-in-the-dark thread embroidery.

Now let me share the lessons I learned from my exploratory phase:
  1. Use the right stabilizer. The stabilizer is what keeps the material steady and firm. For t-shirts and other stretchable materials, the sticky stabilizer is best – the fabric remains stiff against the needle action. Also, you can stick the t-shirt directly on the stabilizer, so you don’t have to trap the shirt in the holding frame, which tends to leave a mark (they call it “frame burn”).
  2. Double check that the threads (needle thread and bobbin thread) are correctly threaded and not snagged anywhere. Or suffer the consequences.
  3. Glow-in-the-dark threads are only cool when the design is heavy, thick, or large. Otherwise, they won’t glow bright enough to be noticeable in the dark.
  4. Before embarking on a critical project, make sure you have the right thread and needle for the material. And enough spares of both.
  5. Do a trial run on scrap material so that you can make the necessary adjustments before working on the actual project.
  6. RTFM (read the f*ing manual). It helps.

Here’s my SE400 doing its thing. You really just have to set it up, push the button, and wait for it to finish. And you’re done! Like magic!

Brother SE400

Finished sewing.

Built-in designs.

The machine has a number of built-in designs and fonts, but a wide variety are available online, for sale and for free. Some folks make a living creating machine embroidery designs. Maybe someday I’ll look into that.

April 24, 2012

Less Stain from Stainless Flatware

If you're anything like me, you toss your used flatware in the sink, then gather all of them in the dishwasher waiting for the appliance to be full enough to run a wash. Then after about a year, you notice that your once-shiny stainless flatware are all cloudy and cruddy. You try to remove the crud by hand-washing the spoons and forks with a sponge and dish detergent but the shine never comes back.


If you're anything like me, you try "The Eraser" because it can clean everything!

Then you hear yourself scream, "Whoa! Check this out!"

Yes, the all-around Eraser (available as Mr. Clean Magic Eraser and Scotch Brite Easy Eraser) is the answer.


Wet the pad, slide it over the flatware surface just a few times, and watch the spoons and forks become shiny and new again! Rinse with clean water and towel dry. Revive several sets of stainful stainless flatware in just a few minutes.

If you're anything like me.

March 12, 2012

The Seven Roses Project

In Dec 2007, I bought a set of three bare-root roses from a warehouse store.


I planted them onto containers and wrote about How to Grow Bare-Root Roses in Containers at eHow. Eventually, I planted the pink one on the ground, beside our calamansi tree, but left the other two in their pots. I didn't fuss over them too much, the way a serious rose grower would, but I loved how every now and then I could bring in beautiful flowers from my own garden.


To celebrate spring this year, a local home improvement store offered shrubs on discount. The shrubs included hybrid teas and grandifloras. I couldn't pass it up -- I chose four.


This time I couldn't leave the roses in their pots because they would be harder to maintain than if I put them in the ground. So, now I had a project cut out for me.


I chose a sunny location in the front yard so that I'll see the plants all the time. With a plan in hand, I gathered the materials I would need to transfer six rose plants from their pots to the ground. I would need two bags of garden soil (they have organic ones now!), a bag of rose food, and concrete borders that matched the ones we already had.


I marked the area, peeled and rolled up the sod, and dug the holes one by one. Sounds easy when you say it like that, but that sentence took me three days in real life. And several pain relievers.


I enriched each hole with garden soil and rose food before I plopped the plant in (Florida soil is mostly sand). Then I positioned the borders and watered the entire plot.


Project complete!


The seven roses are: Intrigue (lavender), Queen Elizabeth (pink), Ambassador (orange), New Day (yellow), Scarlet Knight (red), Pristine (pale pink), and Eclipse (yellow-orange).


December 21, 2011

Like Fish In A Barrel

It started out back in 2009 as a water feature -- a half-barrel to catch the water that flowed through the rainchain from the roof gutters. We found a waterproofed half-barrel at a garden center, where we also bought the marginal aquatic plants, Dwarf Giant Papyrus, Powdery Thalia, and Pickerelweed. We got a lotus bulb but it never woke up.


Pickerelweed

We weren’t really planning on having fish in the barrel but stagnant water would mean breeding ground for mosquitoes. So, I assigned a couple of Goldfishes and a Platy from our aquarium to take care of the mosquito larvae that could populate the barrel. All went well until winter came.

January 2010 was fierce; it froze the barrel, together with everything in it. I was devastated, not only because the fish and most of the plants died, but also because it didn’t even occur to me that I actually had the means to prevent the imminent disaster.

Frozen water. See dead fish in the center of the photo.

The following winter, I was prepared. As soon as the weather cooled down, I put an aquarium heater in the barrel and made sure that the setting was just right – no ice cube fishies, but no fish stew either. Everyone survived.

Last summer, I added more fish. I introduced a few tropical livebearers, both male and female, and let nature take its course. The barrel is now teeming with Guppies, Platys, and Swordtails.


We had our first chilly morning a few weeks ago, and no, we didn’t forget to install the heater. We won't let Mother Winter mess with our pets again, even if they are fish in a barrel.