Showing posts with label crafts. Show all posts

October 18, 2015

Captain John Hart Costume Project


Oneal is back with another costuming project for me. He is attending a Dr. Who theme wedding and wants to go as Captain John Hart from the spinoff “Torchwood.”

I asked, “Who?”

He said, “Yes.”

I asked again, “Captain Who?”

He said, “No, Dr. Who. Captain John Hart.”

Before I could open my mouth again, he showed me the online photos of Captain John Hart. He said that’s the jacket he wants to wear to the wedding. 

Captain John Hart of Torchwood

Oneal said he will look for a jacket of the same color and texture and I can just convert it. Add the braid and buttons accessories, and adjust the collar and sleeves.

Easy as pie. If he can bring me the jacket (so I won’t have to make one from scratch), I’ll do the required renovations.

The search for the jacket took a few weekend trips to where jackets are sold. Remotely, he consulted with me on the options he found.


Oneal searching for the right jacket.

One had black sleeves, one looked like salmon, one looked like eggplant. We agreed on the maroon corduroy. I could make it work.

Next was the search for the braid material, or technically, the soutache. And the brass buttons. After total fails at several sewing stores, he landed at Carolina’s where they had these fancy options:
  
Searching for the right soutache.

Since it was going to be a wedding anyway, we agreed to use the white one with the silver trim (but without glitter or crystals). Here’s our messaging about the soutache and buttons.


He ended up buying a whole roll of the soutache (60+ feet) and the store's entire stash of gold buttons (a dozen more than we needed).

With all the materials available, I went to work. Digging through the sewing accessories I hauled from the US, I determined that the best way to work with the soutache is with a sticky stabilizer and fusing tape. Keeping an eye on the reference photo, I estimated the size and shape of the area the soutache will cover and cut a paper pattern.

Materials for the Captain John Hart chest braid.

This part required a lot of patience but the result was remarkable!

Making the Captain John Hart chest braid.

The next step was to sew the soutache onto the jacket. Two straight lines for now, just to hold the panel in place. Final stitching will be done after the fitting.

Sewing the soutache onto the jacket.

Oneal went searching again, this time for dark blue corduroy material that I will use for the sleeves and collar. But his search was a bust, so I said, “How about I use a blue microfiber that I have in my fabric stash? I will show you.”

This was the jacket Oneal tried for a final fitting. Just a few buttons, and pins all over the place.

Captain John Hart jacket in pins.

The jacket passed the fitting.

Captain John Hart jacket project Before-and-After.

Achievement unlocked!

Here’s Oneal at the wedding, with his wife wearing the project in my next blog entry.

Oneal at the Dr. Who theme wedding as Captain John Hart.

May 31, 2014

Cardboard Shadow Box Project

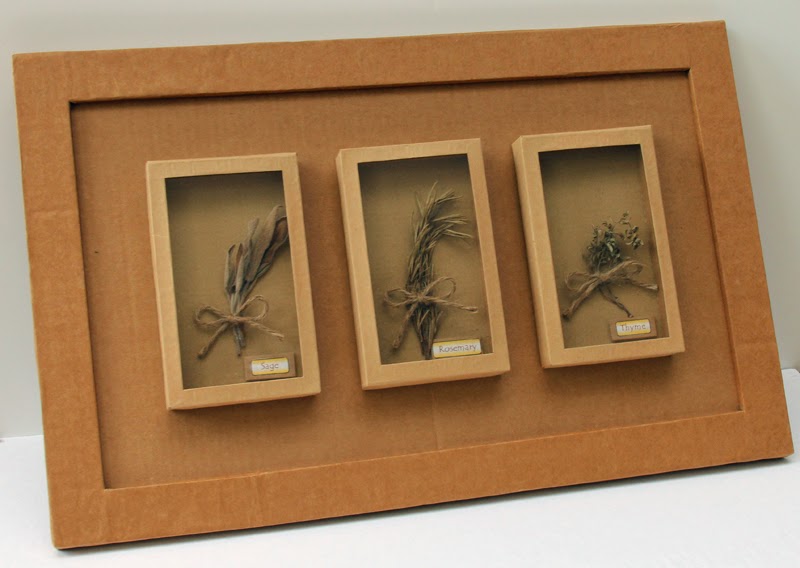
My creativity is mostly prompted by necessity. With no spare finances to purchase shadow boxes to encase some dried herbs I wanted to display, I resorted to making my own. My medium of choice was what I had plenty of: cardboard and brown paper.

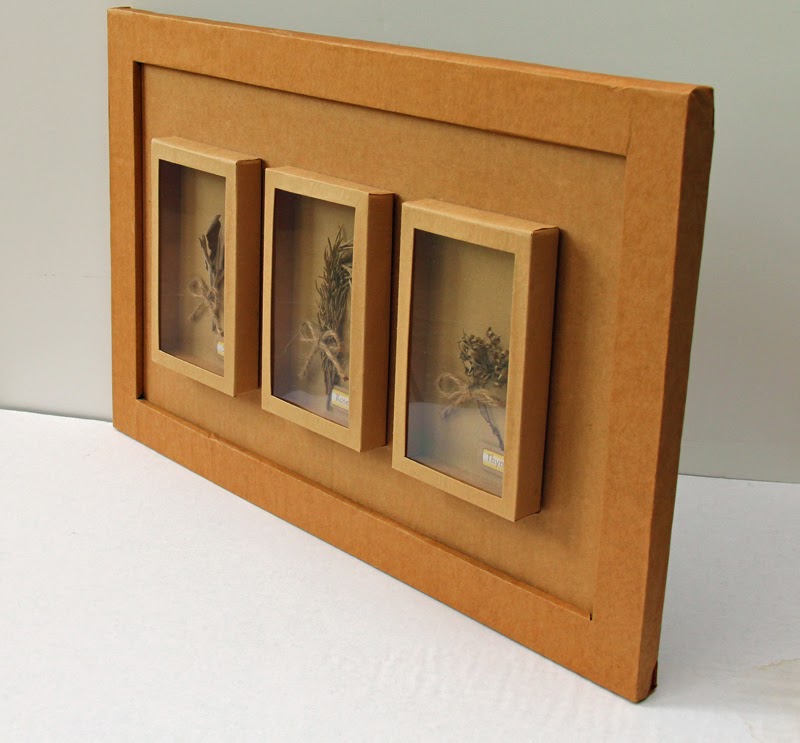
First, I cut and glued cardboard pieces together to form small rectangular box frames and wrapped them with brown paper to cover the seams. For the window panes of the boxes, I used clear hard plastic cut out from product packaging that I had stored, thanks to my packrat foresight.

Cardboard Shadow Box

Then I prepared the backing for the shadow boxes. I printed out the names of the herbs and mounted them on tiny pieces of cardboard to serve as nameplates. Then I punched two holes in the middle of the backing, strung twine through, and tied down (with a nice ribbon knot) a bunch of the dried herbs I wanted to showcase.

Cardboard Shadow Box

Cardboard Shadow Box

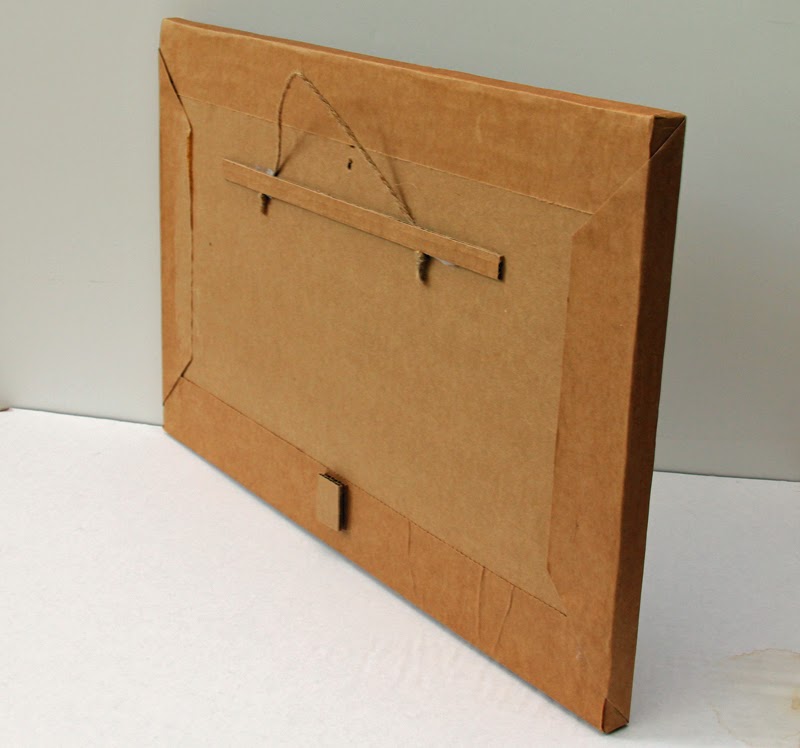
The final assembly was just a matter of gluing the backing to the shadow box frame, and gluing the finished box to the main frame that I prepared also with cardboard and brown paper. Add a twine hanger to the back, and there it is – all natural, very lightweight, and entirely handmade.

Cardboard Shadow Box - back

Cardboard Shadow Box for showcasing dried herbs

I took these pictures a few days ago, but I made the shadow box back in 2002 (which is why there are no step-by-step build photos). The herbs look old and droopy now but the presentation is still good.

August 10, 2013

The Hobbit: Lord Elrond Costume: Final

The final touches were attaching the stud covers to all the bare studs on the vambrace and boots, spraying acrylic sealer to all the surfaces covered by Mod Podge to seal in the tackiness of the gloss finish.

Lord Elrond armor costume handmade by Ruby Bayan.

Here’s the “Wearing Sequence” panel I created to show how to wear the armor pieces in order.

Lord Elrond armor costume panel handmade by Ruby Bayan.

And here’s a shot of my favorite McDonald’s Minion, Dave, who says, “Ba-nah-naaah”. 

Lord Elrond armor costume handmade by Ruby Bayan.


My showcase poster:
Lord Elrond armor costume handmade by Ruby Bayan.

… and my outdoor shot to show the natural color of the armor. Also shows how hot I was, falling out of bed and into my husband’s boots at 11 am -- I mean, literally hot -- it was 95F in the shade that August morning.

Lord Elrond armor costume handmade by Ruby Bayan.

June 9, 2013

Pirate Party Food Labels

The task was to make food labels for the dishes that would be served at a pirate-themed birthday party for a two-year old. The boy’s mother gave me a list of 11 food names that she already made up. The list included Dead Man’s Fingers (hotdogs), Cannonballs (meatballs), Salty Bones (pretzels), Parrot Wings (chicken wings), and Treasure (colored pasta salad).

Pirate Party Food Labels: Parrots Wings, Treasure, Catch of the Day

Of course, the first thing I did was Google pirate party food labels to get an idea of what others have created. And because the boy had been a huge fan of Jake and the Neverland Pirates, I tried looking for images I could use. Thank you, Internet, for the pictures! (Actually, Disney encourages pirate parties. Check out their "Planning a Pirate Party" page.)

So, here are the steps in making the pirate food labels that graced our birthday boy’s pirate party.

1. Gather all the images. Google and right click to “save image”. Jake and the Neverland Pirate images are available online in high resolution versions. Choose the skull-and-bones image to use for the flags. Pick a scroll image to use as the background of the text. Search for free fonts and pick a pirate type, then download so that you can use it on your image manipulation application (like Photoshop).

2. Arrange, size, and print your images. Print a sample and complete one prototype food label before making an entire batch.

3. Prepare the tools and materials: Barbecue sticks, olive skewers (snip off the sharp ends), black colored paper, adhesive tape, fancy scissors (wavy is good for the pirate theme), regular scissors, double-sided tape (or glue), hole puncher.

4. Print your images on regular bond paper.
Print out from online images.

5. Cut the labels and colored paper then tape (or glue together) to make the banners.
Pirate banners from barbecue sticks.

6. Punch the holes at the ends of the printed scrolls.
Punch holes on the scroll design.

7. Cut the skull-and-bones images into little flags and tape them onto the barbecue sticks.
Make tiny pirate flags.

8. Tape a barbecue stick onto the back of a banner.
Assemble the pirate party food labels.

9. Slide an olive skewer through the holes in the banner (this adds dimension to the banners), and secure the skewers with a small piece of tape to prevent them from slipping off.
Tape the barbecue stick and olive skewer to the banner.

And there you have it! 
Pirate party food labels.

Pirate party food labels.


Pirate party food labels: Ship n Dip, Salty Bones


Pirate party food labels: Sea Wrap and Dead Man's Fingers

Be creative in making up pirate names for the foodstuff you will serve at the party. Enjoy!

10/10/15 Update: I see that a lot of people come to my blog to check out these pirate party food labels. If you want me to make a set for you, please email me: rubybayan@gmail.com so that we can discuss. Please note that I am currently based in Manila. :)

January 17, 2013

Resin and Polymer Clay Bracelet Inspired by The Hobbit

Am I evolving into a mixed media artist? Certainly felt like it when I got my first resin casting kit a few weeks ago. Creations with polymer clay and resin – should be fun, right? I had to give it a try. Throw in the Hobbit theme, and voila!

Hobbit-inspired bracelet made of polymer clay and resin.

For those curious about how I did it, here’s the story.

First, let me share my first-try pieces with resin. Not bad. The process is easy enough.

Resin casting kit and first output.

Suddenly, I had this design in my head of a Hobbit-inspired bracelet combining polymer clay, resin, and cord knotting. Since there would be 12, no, 13 pieces, each element had to be small enough to complete a bracelet that wouldn’t be too bulky. I started making circles with polymer clay. Bake clay, then on to the next step.

Polymer clay backing.

I had printed out a photo of the dwarves when I first started making Thorin’s scalemail armor, so that would be the source of my bracelet photos.

Hobbit photo for dwarf faces.

Long story short, I prepped the dwarf faces, glued them onto the round setting, sealed them with Mod Podge (this step is essential because without the seal, the resin will eat up the photo), and delicately covered each photo with resin one drop at a time.

Preparing dwarf faces for the Hobbit bracelet.

Hobbit dwarves under resin.

No matter how slowly you stir the resin mixture, bubbles will appear in the pour. So I had to tend to the pieces for a few hours, checking to see if bubbles are forming.

Bubbles forming in the resin cast.

To remove the bubbles, I used a butane lighter. I just swiped the flame very quickly a few inches over the bubbly piece to create enough heat to pop the bubbles. Some crafters blow through a straw, but that’s tedious (and your breath moisture could create droplets that will end up on the piece); others use a heat gun (which I don’t have) or a hair dryer (which some don’t recommend because the air flow is hard to control and it could kick up dust/debris that will stick to the piece).

A little heat to pop the bubbles in the resin.

 I covered the curing pieces to protect them from dust and lint.

Cover to protect the resin from dust and lint.

While the resin was curing (this is the toughest part for me -- the resin requires two days to harden), I molded the back pieces – the thingies that would help me string the bracelet. Nothing fancy, just has to do the job. Baked, then after the resin hardened, glued them on.

The back pieces for stringing the bracelet.

Glue the back pieces onto the resin cast.

It was a little tricky knotting the band of dwarves but I got it together. And here’s the knotting effort:

Hobbit-inspired bracelet knotting.

And the finished product. Who can tell me why my OCD is nudging me to redo the final step?

Hobbit-inspired bracelet.


December 20, 2012

Machine Embroidery – Exploratory Phase

The first time a saw an automatic embroidery machine do its thing, I thought it was magic! That was many years ago, when magic was beyond my reach. Fortunately, technology helps things along, so now the machines have become affordable. When Mike asked me what I wanted for Christmas, I said I wanted magic!

Since the Brother SE400 Enthusiast arrived a couple of weeks ago, I have been marveling at what it can do. (Follow the link to the Brother site for the product features.)

Brother SE400 Enthusiast


I was so excited that I quickly got extra bobbins and two types of stabilizers. 

Stabilizers and bobbins.

I also bought a ton of discounted embroidery thread from eBay.  I got the 63 Brother colors, a glow-in-the-dark set, and even an all-purpose fancy colors pack. And a rack too.
63 Brother Embroidery Thread Colors.

Glow-in-the-Dark thread.

Spools of embroidery and all-purpose thread.

All-purpose thread.


I know how to sew, but I guess I was just so fascinated with the automatic embroidery that on my second design I didn’t notice that the thread had snagged – it tugged on the needle as it embroidered, then I heard a *snap* and the machine stopped cold. I had to use pliers to pry the broken tip from the bobbin case.

Broken needle.

Then, when I worked on my third design, I didn’t notice that the cloth had folded under the holding frame, so the machine stitched over two layers of material. Duh.

Tiny hearts.

Of course, I had to try the monogram function on a face towel. It worked. Now I know I have the capability to make monogrammed whatever projects as gifts and giveaways. Ha!

Monogrammed face towel.

And here are the black t-shirts I embroidered with glow-in-the-dark thread. Not bad for a first try embroidering on t-shirts. (I figured from the frumpy results that the sticky back stabilizer is essential for t-shirt embroidery.)

Glow-in-the-dark thread embroidery.

Now let me share the lessons I learned from my exploratory phase:
  1. Use the right stabilizer. The stabilizer is what keeps the material steady and firm. For t-shirts and other stretchable materials, the sticky stabilizer is best – the fabric remains stiff against the needle action. Also, you can stick the t-shirt directly on the stabilizer, so you don’t have to trap the shirt in the holding frame, which tends to leave a mark (they call it “frame burn”).
  2. Double check that the threads (needle thread and bobbin thread) are correctly threaded and not snagged anywhere. Or suffer the consequences.
  3. Glow-in-the-dark threads are only cool when the design is heavy, thick, or large. Otherwise, they won’t glow bright enough to be noticeable in the dark.
  4. Before embarking on a critical project, make sure you have the right thread and needle for the material. And enough spares of both.
  5. Do a trial run on scrap material so that you can make the necessary adjustments before working on the actual project.
  6. RTFM (read the f*ing manual). It helps.

Here’s my SE400 doing its thing. You really just have to set it up, push the button, and wait for it to finish. And you’re done! Like magic!

Brother SE400

Finished sewing.

Built-in designs.

The machine has a number of built-in designs and fonts, but a wide variety are available online, for sale and for free. Some folks make a living creating machine embroidery designs. Maybe someday I’ll look into that.