Showing posts with label kitchen. Show all posts

August 8, 2015

Organizing Recyclable Plastic Bags

Recyclable plastic bags don’t always get reused right away, so they accumulate in the dark recesses of your kitchen cabinets. And when it’s time to reuse, you “ukay-ukay” (dig) into them frantically looking for the right size bag for your purpose. It’s like stashing your underwear in your drawer without folding and then rummaging through everything looking for that particular piece you want to wear. No offense to folks who choose this kind of excitement but, to me, it’s an inconvenience (yes, I fold underwear).   

This was my stash of recyclable plastic bags before I found a way to organize them:

Stash of recyclable plastic bags.

I figured that all I needed was some simple manner to quickly identify the bags, keep the same sizes together, and make them quickly accessible for reuse. So, let’s see what we have around the house. Aha! A stash of empty tissue paper boxes. (Hah, I bet you were sure I had those piled somewhere.)
  
Empty tissue boxes for repurposing.

Now to put up a grid to identify the bags. I’ll need a piece of paper as large as the largest recyclable bag I have in the stash (could’ve recycled a brown paper bag but I had just cut up the biggest one in my pile into a costume pattern). I sorted the bags according to size (I was surprised there were only five universal sizes) and drew the measurements onto the paper to serve as a handy guide. Then I taped the paper to the inner side of the cabinet door.

Grid of plastic bag sizes.

I labeled five tissue boxes accordingly, and slipped the bags into their respective storage containers. And there they are!

Organized recyclable plastic bags.

Organized recyclable plastic bags.

Now it’s a snap to put away the bags and pull out the right-sized bag for the purpose. No more unsightly stashing, fumbling, and rummaging. Recyclable bags organized. Just like my underwear.  


April 24, 2015

Cardboard Spice Rack #3

When you move into a new place, you don’t always have the amenities you’re used to. In my case, our new residence has no spice rack. Nowhere to organize my spices! It does have a blank wall above the sink, which is the only open space available in our very conservative condo-type kitchen area. I figured it’s the best place to install another handcrafted cardboard spice rack (I had created two before – one for our old small apartment in Orlando, another for a friend).

I have an inordinate (wow, “inordinate”) amount of cardboard, aka moving boxes, so this simple shelving project would make a teeny tiny dent on my stash.


Measure the wall, estimate the spice container sizes, cut up the cardboard, fire up the glue gun, splash on some leftover paint, and there it is: my third cardboard spice rack of all time.


Recycled cardboard project

Preparing the spice rack frame

Painting the spice rack

Mounted cardboard spice rack.

June 7, 2014

How to Slice Cantaloupe into Chunks

I remember growing up detesting one and only one dessert fruit – the cantaloupe.  In the Philippines, we call it melon (accent on the “lon”). Somehow I couldn’t tolerate the taste and texture, and I didn’t know why.

Then a friend convinced me to try the melon juice – sweetened cold water infused with melon flesh delicately grated from the fruit using a tool that creates long orange “worm” strips (I’ll write about that next time).  After I enjoyed that wonderfully refreshing and tasty drink, the cantaloupe and I became buddies.

Here in the US, cantaloupes are available in groceries as whole fruits, shrink-wrapped slices with the skin on, and chunks in clamshell containers. Naturally, they are most expensive when already prepared bite-size, ready to eat; the price of a small bowl of chunks is sometimes higher than that of a whole fresh harvest fruit.

So, whenever I feel prudent, I ignore the chunks, grab a whole fruit, and set my mind to slicing the cantaloupe myself. It’s really quite easy. Let me show you.

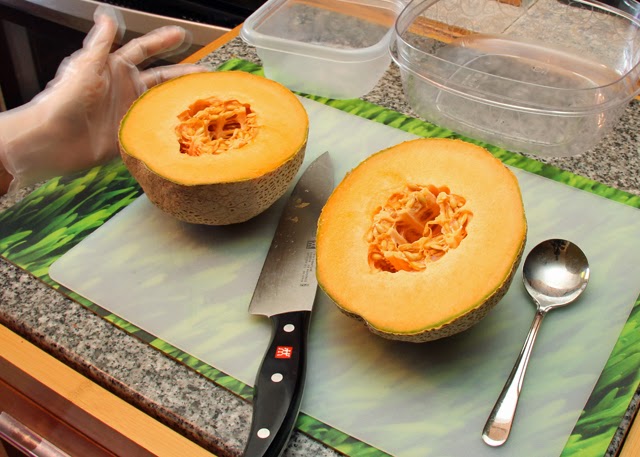
1. Get a whole cantaloupe. You will know it’s ripe and sweet when the skin is starting to get wrinkly and the fruit is giving off a sweet aroma. Grab a cutting board, kitchen knife, spoon, container for the seeds, and container for the chunks.  


Get a whole cantaloupe.

2. Slice the fruit in half. It doesn’t matter if it’s lengthwise or crosswise, because the fruit is generally round. I prefer to slice crosswise, but that’s just me.

Slice the cantaloupe in half.

3. Scoop out the seeds and fibrous material from the core of the fruit.

Scoop out the cantaloupe seeds.

4. Lay the half on the cutting board like an upside-down bowl. Slice off the skin by working from the top and down the sides.

Peel off the skin.

Peeled cantaloupe.

5. Make vertical cuts, about an inch wide, across the skinned half fruit.

Slice the cantaloupe.

6. Follow with 1-inch perpendicular cuts to create chunks. They won’t be the same sizes but you can follow-up with quick cuts to make the big chunks smaller.

Slice the cantaloupe into chunks.


Slice the cantaloupe into chunks.

Et voila! Bon appetit!

Cantaloupe chunks.


May 26, 2014

How to Slice Pineapple Into Chunks

Pineapple season is here, and the “fruit,” which is actually a mass of berries growing along the bromeliad’s stalk, is once again popular in all grocery produce sections. It’s time to talk about how to slice them.

Born and raised in the Philippines (the top pineapple producing country in the world), I grew up with little appreciation for any kind of fruit juice other than pineapple. I also learned how to peel and cut pineapples without wasting any of the sweet and juicy flesh.

I’ve seen two convenient ways to prepare pineapples. One is to use a pineapple corer/slicer that cuts into the pineapple with a rotating blade and leaves the core and the skin behind. Another is to pare off the skin thick enough to include the “eyes” leaving a clean flesh for slicing. Both ways are quick and easy but wasteful because a lot of the delectable flesh is discarded in the process.

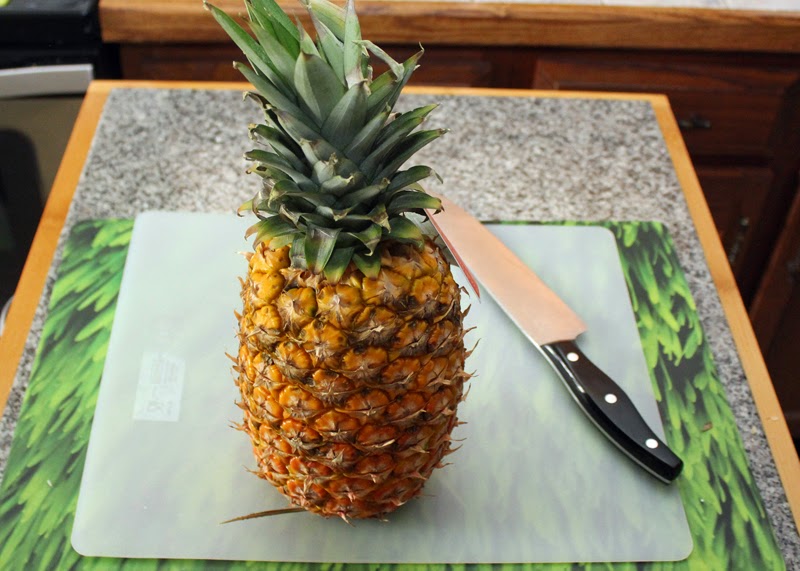
Here’s how I was taught to prepare a whole fresh pineapple into bite-size chunks without being wasteful [quick tip: wear plastic gloves to protect your hands from the acidic juices of the pineapple]:

Del Monte Pineapple

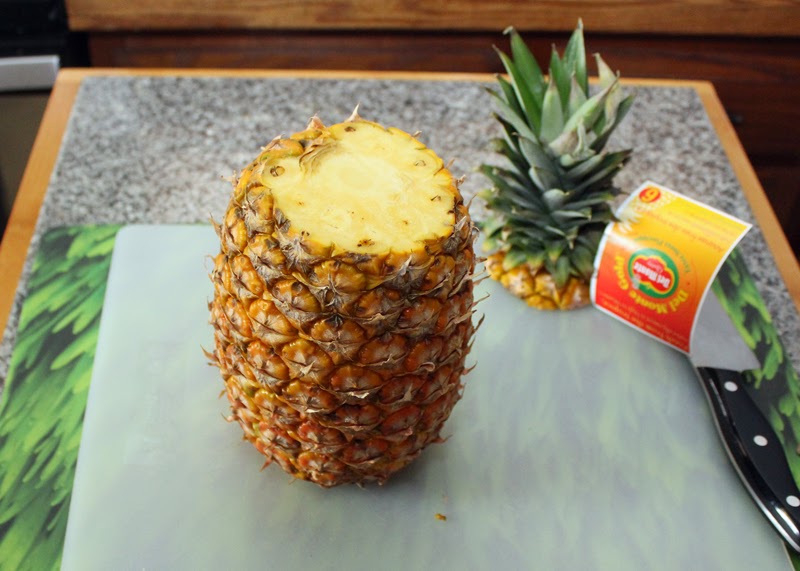
1. Slice the top off.  [Consider planting this top in your garden. It will take a couple of years before you can harvest your own one pineapple from it, which will most likely not be as big nor as sweet as what you could get from the grocery, but it’s always cool to say you grew your own!] Slice the bottom off too.

Pineapple - slice the top off.

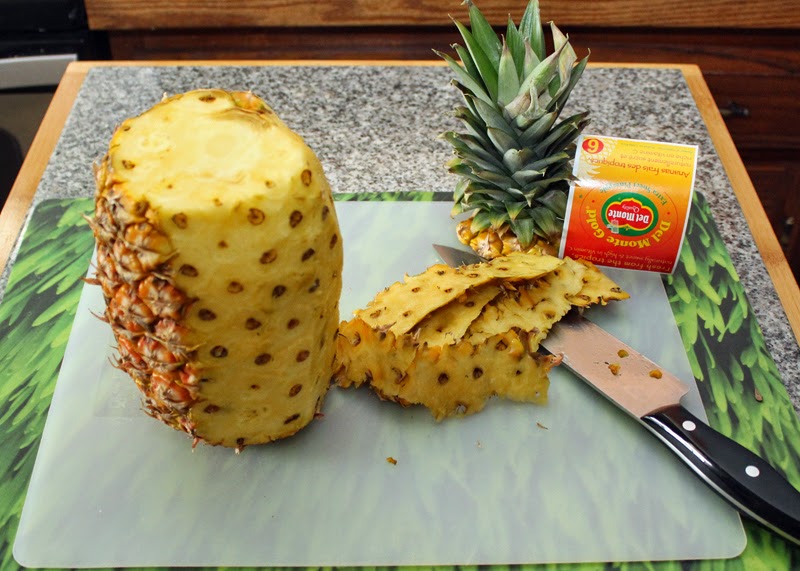
2. Cut away the skin just thin enough to expose the flesh. Parts of the “eyes” should still be on the fruit. You can skin the pineapple in a spiral or horizontally – I prefer to skin vertically.

Pineapple - cut away the skin.

3. Following the spiral pattern of the eyes, cut along the sides of the eyes to take them out. You can run the knife with one long spiral cut on one side of the eyes, from the top of the pineapple to the bottom, then a matching spiral cut on the other side of the eyes to scoop out the whole length. I usually work with two to three eyes at a time.   

Pineapple - take the eyes out.

Pineapple - take the eyes out.

4. Quarter the pineapple lengthwise and cut out the tough core. [Some folks who are into juicing don’t discard the core.]

Pineapple - quarter.

Pineapple - slice off the core.

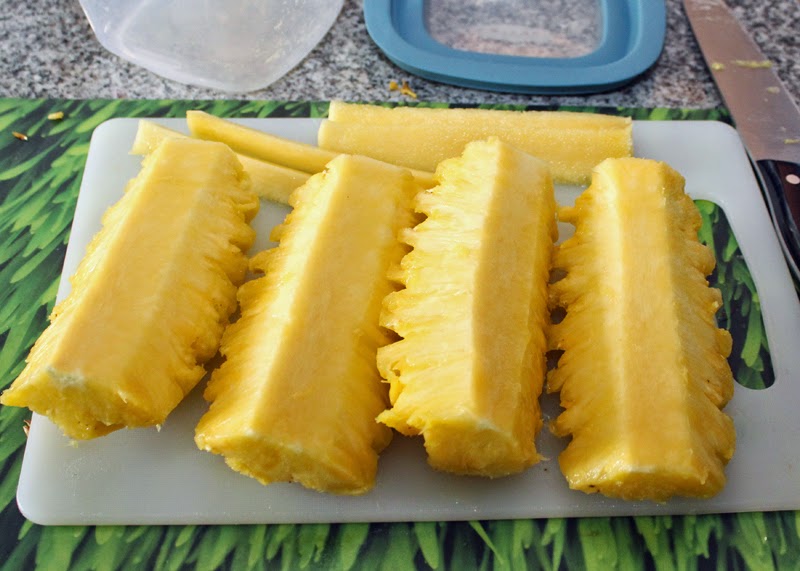
5. Halve each quarter lengthwise. Cut into bite-size pieces and enjoy!

Pineapple - slice lengthwise.

Pineapple - cut to bite-size pieces.


I enjoy my fresh pineapple chunks as is, with some salt or sugar, to flavor water, or as an ingredient of our breakfast smoothie. How do you enjoy yours? 

May 19, 2014

Breakfast Smoothie For Two

Our new massage therapist introduced us to the concept of taking raw fruits and vegetables first thing in the morning. While she was actually telling us about juicing, Mike and I decided that we would rather go with blending (aka smoothies). Juicing reduces the fruits and vegetables into liquid form, hastening absorption by the digestive system; blending chops and grinds the whole food, letting you consume the beneficial fiber of the fruits and vegetables.

After I did more research on the benefits and process of juicing and blending, I became more convinced that I prefer smoothies over juice. Besides, juicers are costly and harder to clean compared to blenders.

Our therapist suggested only three ingredients for the breakfast mix: carrots, cucumbers, and beets. She said that by taking these, first thing in the morning, we will not only become healthier but also feel better.

Because my research opened my eyes to this healthy sipping of plant nutrients, I thought: why not add what we’ve always known to be nutritious too, like celery, lettuce, spinach, ginger, and parsley? To neutralize the earthy taste of the beet root, I added strawberries, grapes, and banana. Nuts would be a great source of protein, so I threw in some chopped almonds. Then I read about the omega-3 and antioxidant properties of flaxseed, so I ground some and added that to our mix.

Breakfast Smoothie Ingredients

Breakfast Smoothie before blending

Sometimes I would vary the combination – oranges instead of strawberries, apple instead of banana. Sometimes the liquid would be no-sugar grape or apple juice, sometimes plain water. Most times I would add an infusion that we drink throughout the day: filtered water with slices of lemon, cucumber, and ginger (this one I learned from a friend who has been taking the infusion to keep her weight down).

Infused Water with Lemon Cucumber Ginger

Every morning, for the past 35 days, Mike and I have been having this smoothie for our first breakfast. To make the mixture refreshingly cool, I sometimes use frozen carrots, grapes, and strawberries, then throw in a couple of ice cubes. Some folks suggest frozen bananas or mixed berries.

Breakfast Smoothie before and after blending

Fruit and Vegetable Breakfast Smoothie for Two

So far, Mike and I appreciate the sipping of raw fruits and vegetables in the morning. It gives us a nice kickstart to our day. And with it, we’re already assured of ingesting at least two of the required number of servings per day. That’s certainly better than the “whenever” we were used to.

Here’s a quick list of what I include in one tall mug of our breakfast smoothie:
  • 5-7 sticks baby carrots (could be frozen)
  • 3-4 slices cucumber
  • 2 medium stalks celery
  • 2 thin slices ginger (more than that and the ginger taste dominates)
  • 1 thin slice beet root (makes the smoothie red)
  • 1 grab-full mixed greens (spinach, chard, lettuce, arugula, frisee, radicchio)
  • 1 small bunch parsley
  • 1 medium to large strawberry
  • 5-7 medium grapes (frozen is cool)
  • ½ ripe banana
  • 1 tablespoon crushed almonds
  • 1 tablespoon ground flaxseed
  • Ice cubes after blending
Other ingredients to try soon:
  • kale
  • broccoli
  • romaine
  • cantaloupe
  • mango
  • avocado
  • walnuts
  • cashews
  • chia seeds
  • blueberries
  • raspberries
  • blackberries
Why don't you try it? Then tell me how it goes.

May 19, 2013

Turbo Corn on the Cob


I used to cook corn unhusked in boiling water. Then we acquired a turbo broiler. I thought, if I can grill meat in the broiler, it makes sense that I can grill corn there too. Since then, I have never cooked corn any other way. Now our corn on the cob treats are juicy, tasty, and so addictive.

Here are the steps to cooking the best corn on the cob: 
  1. Purchase raw corn ears that look fresh. Avoid those that have dried husks. Peek into the husks to check that the kernels are plump and not drying out.
    Fresh raw corn
  2. Cut off the tips to remove the hair and the back ends. You might want to use a cleaver to chop off the back end – I twist the scissors around the base of the corn until the stalk is severed enough to allow me to break it off.
    Cut off tips of corn husk.

  3. Place them in the turbo broiler and set the temperature to 450 degrees F. 
    Place corn in turbo broiler.

  4. Cook for 20 minutes.
    Bake corn for 20 minutes.

  5. Enjoy!
    Enjoy juicy, tasty corn on the cob.

Remember: Corn is healthy food. It's what you add to the corn (salt, butter, cheese, mayonnaise, catsup, maple syrup, bacon, pot roast, full rack of ribs, etc.) that makes it unhealthy. Truth.


April 27, 2012

Kitchen Tip: Store Salad Greens For Weeks

Those packages of pre-cut salad greens at the supermarket are pricey because you pay for the processing and the packaging. If you buy the greens in their original harvested form, at the farmer’s market or local grocery store, you will not only get the freshest veggies (next to harvesting from your own backyard) but also save some pocket money.

The challenge is how to keep the greens fresh in the refrigerator for the length of time it takes you to consume all of it. It’s not really a challenge because all you need are plastic bins, paper towels, and a propping device. 

I found the ideal plastic storage bins at a home improvement store. They serve the purpose because they are long enough to fit a whole romaine head and deep enough to fit an average green lettuce head.


Before I store the greens, I pluck out the compromised (bruised) leaves and rinse the heads to remove whatever sand and dirt are stuck in there. If the leaves are a bit limp, I soak the whole thing in water for about half an hour to revive them. Then, a gentle shake to remove the excess water and they’re ready for the bins.

Because contact with too much moisture promotes leaf decay, and the bottom of the bin is where the excess water gathers, I address that concern two ways: I put a double layer of paper towels to absorb the excess moisture in the bin, and I install a propping device over the paper towels to hold the greens away from the wet towels. For my romaine and greenleaf lettuce, I used a plastic packaging tray.


That plastic tray was originally the packaging tray of quail eggs that we bought at an oriental store. It was just what I had on hand; I could’ve used a stack of plastic spoons or a few sauce containers. I actually used several water bottle caps for my iceberg lettuce bin (I’m the Recycle-Repurpose Queen!).


The point is to slightly lift the greens from the bottom of the container to allow air circulation and minimal contact with a wet surface.

The bins are not air-tight (veggies need to breathe too) but they seal well enough to keep the greens from drying out in the fridge. Keeping them in their own containers also ensures they don’t get poisoned by the ethylene gas from certain fruits we also keep in the fridge.


But here’s my biggest reminder: make sure your refrigerator temperature is set no higher than 40 degrees F (4.4 degrees C); the wrong temperature will hasten spoilage.

Another tip: make sure the bottoms of the lettuce heads are facing the back of the fridge. Reason: it’s colder near the back wall of the fridge; leaf tips could freeze. 


April 24, 2012

Less Stain from Stainless Flatware

If you're anything like me, you toss your used flatware in the sink, then gather all of them in the dishwasher waiting for the appliance to be full enough to run a wash. Then after about a year, you notice that your once-shiny stainless flatware are all cloudy and cruddy. You try to remove the crud by hand-washing the spoons and forks with a sponge and dish detergent but the shine never comes back.


If you're anything like me, you try "The Eraser" because it can clean everything!

Then you hear yourself scream, "Whoa! Check this out!"

Yes, the all-around Eraser (available as Mr. Clean Magic Eraser and Scotch Brite Easy Eraser) is the answer.


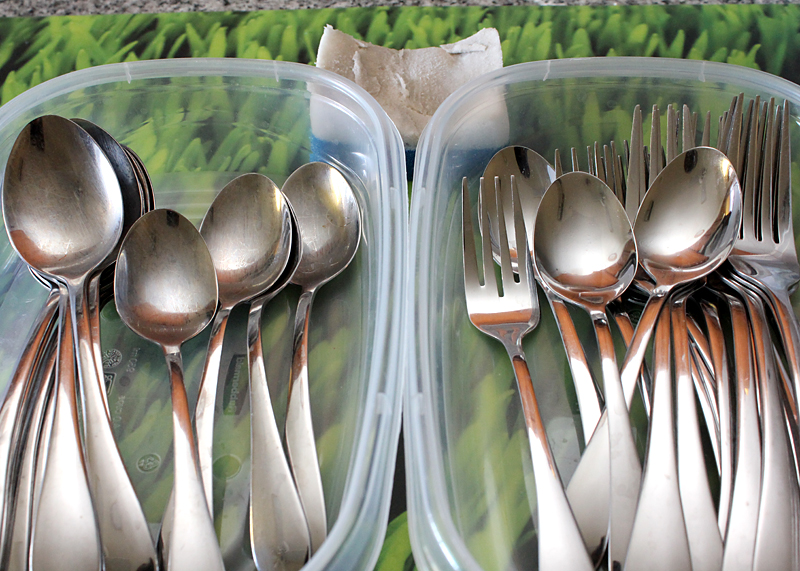
Wet the pad, slide it over the flatware surface just a few times, and watch the spoons and forks become shiny and new again! Rinse with clean water and towel dry. Revive several sets of stainful stainless flatware in just a few minutes.

If you're anything like me.

March 27, 2012

Dirty-Clean Dishwasher Sign

You know how you always wonder if the dishes in the dishwasher are still dirty or already clean? Our solution was to stick the corresponding post-it note on the door of the dishwasher. We had a "Clean Na" (clean already) and a "Dirty Pa" (still dirty) post-it that stays on the bulletin board until needed.

I got tired of managing and replacing the post-it note that sometimes fell on the floor (if not behind the water cooler), and got all crumpled, nasty, and unsticky. I thought I'd get creative and make a decent and real sign.

Because the front panel of our dishwasher from the 80s is plastic, a magnetic sign was out of the question. I had to design one that uses velcro as a fastener. And it has to be reversible and sturdy enough to withstand the constant reversing action. One side would be "CLEAN" and the other side "DIRTY".

I headed for my polymer clay workstation. Bluish grayish colors would work for the Dirty side, and bright whitish colors would be good for the Clean side. I cut an aluminum plate to serve as the backing and covered it with a thin layer of neutral brownish beige blended clay.


The letters had to be large and easy to read (and easy to make), so, arial-looking font was my default. Gray for Dirty, white for Clean.


I baked the letters and the backing first.


To make the sign more interesting, I designed sad and happy faces, and borders. I baked those elements next. Then I super-glued all the elements onto the backing, including the corner posts where the velcro-loop pieces would be attached.


And there it is. A reversible sign that snaps onto the velcro-hook pads I attached to the dishwasher. I threw away the post-it notes for the last time.