Showing posts with label decor. Show all posts

October 31, 2015

Autumn Leaves Lamp Project

“We need a lamp over this coffee station,” my husband said back in 2003. Rather than run out to a home improvement store, I took it on as a DIY challenge.

I did a quick inventory of my crafts materials stash and decided I would use the fall leaves I had gathered from the Blue Ridge Parkway, North Carolina, the previous autumn season. Three types of big maple leaves will be excellent for the lamp design I had in mind.

This was the lighting solution I created back then, hung above our apartment’s coffee station. It served as a task light as well as a mood light for our nighttime activities.

Autumn Leaves Lamp over coffee station

Our apartment’s wall décor evolved over the years, but the lamp remained a fixture.

Autumn Leaves Lamp over coffee station

When we moved to our new home in 2007, the lamp became a nook light in the living room.
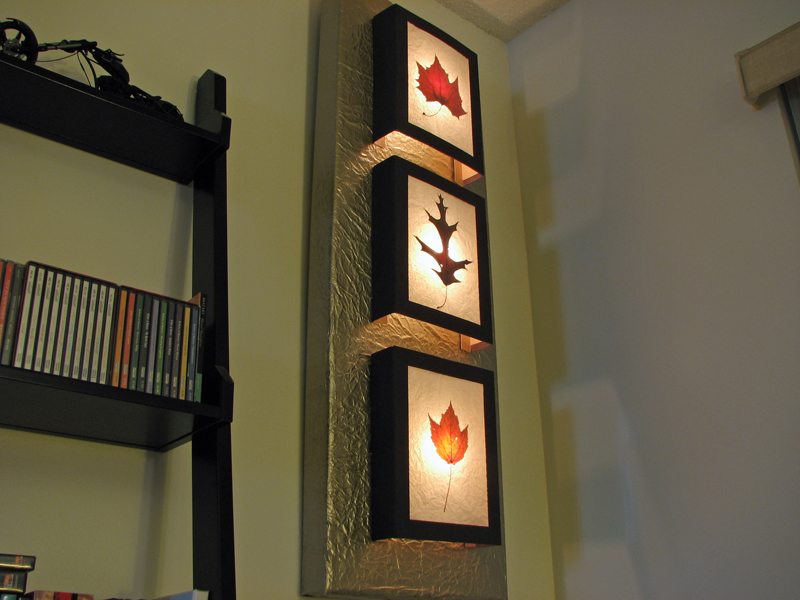
Autumn Leaves Lamp as a nook light

Autumn Leaves Lamp as a nook light

In 2009, we transferred it from the living room to the bedroom, where it became our nightlight until we moved overseas in early 2015.

Autumn Leaves Lamp as a nightlight

Because it would be impractical to ship the lamp halfway across the planet, and getting rid of the leaves was out of the question, I decided to dismantle the lamp and transport the three leaf panels.

Last week, at about the same time I picked up these fallen maple leaves 13 years ago, I built the lamp again. It hangs in its new location in our bedroom, to continue to serve as our nightlight for many more years.    

Autumn Leaves Lamp as a nightlight

Here’s a quick overview of how I made the leaf lamp:

Each pressed leaf is white-glued between plain white tissue paper and a transparent sheet protector. This sandwich is framed in cardboard, folded so that there’s a 2-inch tab to elevate the leaf panel from the base. Slip-in tabs attach the panels to the baseboard without adhesive.

Autumn Leaves Lamp leaf panels

Autumn Leaves Lamp

The baseboard is a sturdy recycled cardboard folded and taped to form a box-frame that’s hollow in the back. I cut slits on the baseboard to coincide with the slip-in tabs of the leaf panels.

Autumn Leaves Lamp baseboard

The first time around, I used crumpled gold gift wrap to cover the cardboard base. This time I painted the baseboard with a metallic bronze shade to jibe with the brownish leaves.

Autumn Leaves Lamp baseboard

The electrical elements are the basic wire, switch, plug, sockets, and lightbulbs. The lighting setup uses the traditional parallel wiring. The electrical is taped to the back of the box-frame, with each light sticking out through the cardboard base, centered behind each leaf.

Autumn Leaves Lamp electricals

Autumn Leaves Lamp lights

Autumn Leaves Lamp

These autumn leaves have been with us since the fall of 2002. And it looks like they will stay with us for much longer. That’s rather impressive.


October 8, 2011

Your Ticket, Please.

What normal people would typically throw away, I keep. I always say to myself, "Someday I'll think of a way to turn this into a work of art."

One of the many things I've kept over the years are movie tickets -- those that the ticket collector at the theater entrance hand back to the patron. I wasn't able to save all the stubs of all the movies we saw because when Mike gets to hold those little pieces of paper, he tends to crumple them and throw them away. He's normal. When I get to hold them, I keep them safely in a pocket in my bag and later slip them into a little hoarding box.

After almost ten years, I suddenly decided I've collected enough of them to turn into a piece of art that I can hang on the wall. I gathered all the stubs and removed all the duplicates (I still kept the duplicates in an envelope, I don't know what for).


Then I looked for that picture frame of a frowning clown that I really meant to repurpose. I glued colored paper on the frame backing and taped the stubs onto them. It's very relaxing, gluing ticket stubs one at a time into a symmetrical structure. Yes, I know. OCD.


And this is the final product -- a glass-framed conversation piece of ticket stubs of some of the movies Mike and I saw together from 2002 to 2011.


What else have I been stashing around here? Hmmm.

September 26, 2011

More Shelves!

ADD. OCD. It took a while for me to wrap my head around the realization that I have a healthy affliction of both. ADD takes me from one project to another, one field of interest to the next, and one... oh, look, a squirrel! Then OCD grabs me and compels me to fix sort organize my belongings stuff in neat aligned symmetrical order.

That's why I need shelves. Lots of shelves. Because I tend to collect things. Assorted things. Especially those that mean something to me. Like colored glass. Matrioshka dolls. Crystal bells. And books. Lots of books. Some CDs. Some DVDs. A few pewter figurines. Japanese artifacts. And Darth Vader.

I must organize my things. I must. So I build shelves. I need shelves.


More shelves!


February 2, 2007

Cleaning Dried Eucalyptus

It was time to clean my dried flower arrangements. The last time I cleaned the one in the bathroom was... never. Not that they didn't really need any cleaning, but because it's a big arrangement with assorted flowers and reeds that it would really require a considerable block of time to clean them.

You wish you could just throw them in a bucket of sudsy water, shwish them around, pull them out, and shake them dry. But you can't. You have to hold each stalk and gently brush off the dust and dirt. You could lose a dried flower or break a twig here and there, but it's part of the cleaning process.

Most of my arrangements are eucalyptus -- I like them for their resiliency. The fragrance is distinct, although I've encountered some that get nasty after a while, smelling like old socks -- I think some driers mess with additive fragrances. But, dried eucalyptus really last forever.

So, I picked up my trusty soft-bristled paintbrush, took a seat out in the patio, dumped all the preserved eucalyptus branches, dried wheat stalks, mini-bamboos, twisted cane sticks, and dehydrated flowers on the round table, and went to work.

It took me about an hour to clean three floral arrangements. I re-arranged only enough for one vase. The rest, I laid out in an oversized shirt box to store for future use. I could've thrown them away... they're dead anyway. But I'm a certified card-carrying packrat, er, conservationist-recycler, who believes that every item in this world could potentially be a component of a revolutionary art piece. Okay, I'm a packrat. But look, these preserved eucalyptus leaves still look good after... so many years!

Eucalyptus leaves are particularly prone to dust... they attract dust... or more like dust clings to them for dear life. That's because the leaves and stems are naturally oily. Eucalyptus is preserved by letting them absorb water spiked with glycerin, an ingredient in the soap-making process. Effectively, the branches are "dry" but remain oily. Therefore, it requires a little patience to clean these branches because you have to brush both sides of each leaf to really do a good job. Blowing or "swiffer"-ing won't do. Well, consider it a zen experience -- not unlike pruning and shaping bonsai. Or, just like you polish your silver, you brush your dried eucalyptus.

Here are some photos I took during my zen moments:


December 11, 2006

Pinecone Tree

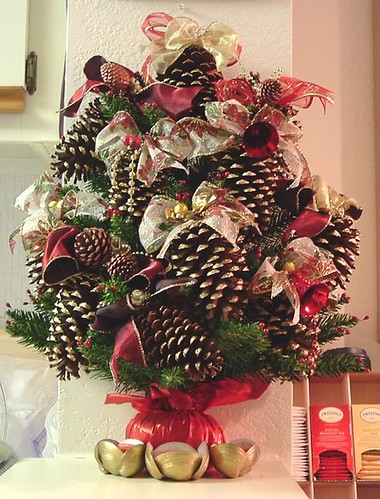
And this is the tabletop tree that the pinecones adorned:


A Merry Christmas to all!

P.S. Check out the candle holders that I made out of clam shells.

November 27, 2006

Pinecone Decor

I always thank my mother for the creativity genes she shared with me. She was a stay-at-home mom and her hands were always busy crafting something… from pastries, to paper beads, to pompom poodle bottles. Today, I'll reminisce one of her favorite holiday decorations: jazzed up pinecones.

Back in those days, we would go to a Farmer's Market to buy big sacks of pinecones that were brought down from the mountains. The objective was to hang the cones on our Christmas tree, so my mom would tie each one with a ribbon. Then she would dab white glue on the tips of the cone’s flaps, sprinkle glitter on the glue, and shake off the excess glitter. Then she would add a cute bow on top and voila! Of course, by the time we were ready to hang the cones, our hands and faces would all be shimmering in green and gold glitter!

This time, it's a little different. I picked up the cones from the lawn across the pond. There's a huge pine tree out there that drops quite a bunch of rather large cones in the middle of the year. So, I've had these pinecones since April, I think.

Some of them fell with part of their stems intact, so it would be easy to tie a handle on them. Those with no stems, I drilled small holes and hot-glued twist ties to serve as their handles.

Then I used an acrylic type metallic paint to color the tips of the cone flaps "glorious gold" and "royal ruby."


Add some ribbons, gold balls, and other accessories, and we're all set.


Now all we need is the tree to hang them on.