May 14, 2013

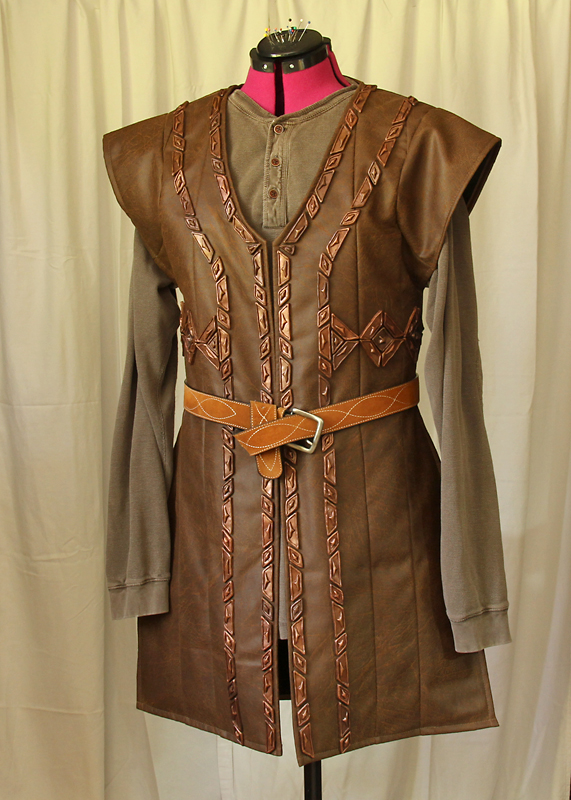
The Hobbit Costume Projects: Fili Vest


I volunteered to build the Fili vest for Nina, a friend who's costuming this Hobbit dwarf, mainly because I wanted to make the scales trim using polymer clay. Much like what I did for the Thorin scalemail shirt for Oneal.

Looking at the official Fili image, I figured I’d have to make roughly 150 scales. I estimated I would need 7-10 pieces of 2-oz brown/copper/beige polymer clay bricks. I also figured I’d require about a yard of 54-inch wide material, preferably faux leather or costume suede. I found everything I needed at a crafts and fabric store and bought them with discount coupons.

I worked on the scales first. I had made a positive and a negative mold of the four different forms, so it was just a matter of pulling 150 positives. Bake, then paint, and done!


Scales for Fili vest made from polymer clay


It was my first time to sew a vest, and my first time to work with suede (definitely more manageable than marine vinyl). So, I was learning as I went along. More like winging it.

Guided by the measurements Nina sent me, I cut a paper pattern. I thought I had it right but after I had cut the fabric, I realized I could’ve done a Dolman sleeve instead of a regular sleeve. That would have been easier to sew, and would’ve looked closer to the Fili original. But, with no extra material to revise my design, I went ahead with what I had already cut.

Costume Suede or Distressed Suede


It was nice working with the costume suede because it doesn’t fray (didn't have to do any serging). And the fabric surface, while feeling a bit plastic-y, does not get tacky under the sewing machine’s pressure foot. I just had to guide the material so that it wouldn’t swerve too much.

Fili vest work in progress 


Fili vest without the scales

As soon as I finished sewing, I laid out the scales to check if I had enough. It turned out that I had made too many because I had counted the scales on the real Fili, without thinking that Nina’s measurements are certainly much smaller.


Attaching scales to the Fili vest

Using super glue, I attached all the scales very carefully. No major mishaps aside from the three times that I tore off a piece of finger skin that had bonded with a clay scale.

Fili Vest by Ruby Bayan Llamas
Fili Vest with natural light.

Fili Vest by Ruby Bayan Llamas
Fili Vest with camera flash.

Overall, it was an easy project – a couple hours for measuring and cutting the pattern and material, maybe three to four hours sewing the vest, and an hour gluing the scales. Preparing the 150 clay scales -- conditioning, shaping, baking, and painting -- probably took the longest in terms of manhours. But you really don’t bother counting the hours when you’re having fun!

The best part of all: bragging rights!

Costuming Vest inspired by Fili of The Hobbit


Fili, Lord Elrond, Thorin Oakenshield costumes by Ruby Bayan

Photo taken at the premier of Desolation of Smaug in Manila, December 2013 with Nina (Fili), Dante (Lord Elrond) and Oneal (Thorin Oakenshield).

March 14, 2013

How to Eat a Giant Muffin at Your Workstation


I love those giant muffins! Don’t you? They’re close to 800 calories, so I really don’t eat a whole one in one sitting. Most of the time, I carry the muffin to my workstation and hack away at it little by little all day. Sometimes I’m a good girl and just take a bite or two and then put it away for another day.

Giant Blueberry Muffin
  
This giant muffin eating habit gave me dilemma, though. When I put the muffin on a plate, take it to my workstation, and chip away at it gradually, the cake breaks apart and then it becomes difficult to eat without dropping crumbs on the floor, the desk, and, of course, my keyboard.

Whether I eat with my fingers, chopsticks (I tried), a fork, or a spoon, or even when I just lift the entire muffin up to my mouth, morsels always end up where they shouldn’t. I’ve had to scrape stepped-on goodness from the floor, invert-tap my keyboard to dislodge wayward nuts and sugar crystals, and lift crumbs off the eyeglasses hanging from my neck. Very cumbersome.

Eating a blueberry muffin.

The solution: a reusable, re-sealable food container. I discovered that the Rubber Maid one-cup food container is just the right size for a giant muffin. I remove the paper under the muffin and plop the enormous treat in the container. 

Giant Muffin in a food container.

The bonus, I can close the container shut anytime I feel guilty for indulging.

Giant Muffin in a closed food container.

A muffin-in-a-container also takes up much less space at my workstation than a muffin-on-a-plate. 

Eating muffin at workstation.

Using a teaspoon, I scoop a mouthful as I hold the container up close to my chin. All the loose particles stay in the cup and I get to eat each and every one of them without having to tip my keyboard. 

Finishing muffin crumbs at a workstation.

Giant muffin eating dilemma solved!

February 22, 2013

Snack Chopsticks


My son grew up in front of the computer. The mouse and keyboard are extensions of his arms. So if he needs to eat while interfacing with his tech, which he does all the time, he needs to be able to put food in his mouth without dirtying his typing/gaming fingers. While a spoon and fork work with most food stuff, they’re not really efficient for snacks like potato chips and cheese curls.


I wouldn’t doubt that my son thought of this first, but yes, he uses chopsticks to eat snacks when multi-tasking with tech.

Pretty soon, I was using chopsticks too while working on my articles and blogs (I actually have a snack set beside me right now). This blog is not about using chopsticks – I bet everyone already knows that. This is about how to reuse the chopsticks.

You’ll notice that only the tips of the chopsticks get dirtied by the cheese curls. And when you don’t care to finish the whole bag of snacks, you close the bag (or plastic container) and throw the wooden sticks away (no, you don't want to reuse some old and nasty cruddy infected stick tips!). So you’ll have to get a new set of sticks for the next time you feel the urge for salty cheesy snacks. Ergo, you’ll need a lot of chopsticks on standby.

Snack Chopsticks

Of course, you can get a pair of metal chopsticks (which my son gave me some time ago -- he had a spare), and you can wash them after every use. But if you don't want to have to bother about washing the sticks, or you only have those sticks they give out at the Chinese restaurant, then here’s how to make the most of the wooden sticks -- without having to leave your workstation.

Cut off the dirty tips with a pair of cutting pliers, pruning shears, or a cleaver (you should have one of these implements in your workstation drawer so you won’t have to stand up to get it). 

Chopped off chopstick tips.

Feed the newly-cut tips into your pencil sharpener (also a mandatory implement in your work area).


Sharpener.

And there you have it – a clean pair of wooden chopsticks for your next cheesy snack.


Sharpened reusable snack chopsticks.

Tip: It’s okay to pull out a new set of whole chopsticks when the reused ones are already less than three inches long.

January 17, 2013

Resin and Polymer Clay Bracelet Inspired by The Hobbit

Am I evolving into a mixed media artist? Certainly felt like it when I got my first resin casting kit a few weeks ago. Creations with polymer clay and resin – should be fun, right? I had to give it a try. Throw in the Hobbit theme, and voila!

Hobbit-inspired bracelet made of polymer clay and resin.

For those curious about how I did it, here’s the story.

First, let me share my first-try pieces with resin. Not bad. The process is easy enough.

Resin casting kit and first output.

Suddenly, I had this design in my head of a Hobbit-inspired bracelet combining polymer clay, resin, and cord knotting. Since there would be 12, no, 13 pieces, each element had to be small enough to complete a bracelet that wouldn’t be too bulky. I started making circles with polymer clay. Bake clay, then on to the next step.

Polymer clay backing.

I had printed out a photo of the dwarves when I first started making Thorin’s scalemail armor, so that would be the source of my bracelet photos.

Hobbit photo for dwarf faces.

Long story short, I prepped the dwarf faces, glued them onto the round setting, sealed them with Mod Podge (this step is essential because without the seal, the resin will eat up the photo), and delicately covered each photo with resin one drop at a time.

Preparing dwarf faces for the Hobbit bracelet.

Hobbit dwarves under resin.

No matter how slowly you stir the resin mixture, bubbles will appear in the pour. So I had to tend to the pieces for a few hours, checking to see if bubbles are forming.

Bubbles forming in the resin cast.

To remove the bubbles, I used a butane lighter. I just swiped the flame very quickly a few inches over the bubbly piece to create enough heat to pop the bubbles. Some crafters blow through a straw, but that’s tedious (and your breath moisture could create droplets that will end up on the piece); others use a heat gun (which I don’t have) or a hair dryer (which some don’t recommend because the air flow is hard to control and it could kick up dust/debris that will stick to the piece).

A little heat to pop the bubbles in the resin.

 I covered the curing pieces to protect them from dust and lint.

Cover to protect the resin from dust and lint.

While the resin was curing (this is the toughest part for me -- the resin requires two days to harden), I molded the back pieces – the thingies that would help me string the bracelet. Nothing fancy, just has to do the job. Baked, then after the resin hardened, glued them on.

The back pieces for stringing the bracelet.

Glue the back pieces onto the resin cast.

It was a little tricky knotting the band of dwarves but I got it together. And here’s the knotting effort:

Hobbit-inspired bracelet knotting.

And the finished product. Who can tell me why my OCD is nudging me to redo the final step?

Hobbit-inspired bracelet.


January 8, 2013

Repurposing a Star Wars Bag

At the Star Wars Celebration VI last August, WeLoveFine.com gave away humongous bags for the t-shirts they sold. You buy one t-shirt and you get this gigantic tarp-material bag that you end up carrying around like a billboard.

WeLoveFine.com's Star Wars Bag at Celebration VI

Not a bad advertising gimmick. For tall people. I had to tie a knot on the handle so that I could carry it over my shoulder without the bottom dragging across the floor. Over the four days of the convention, I ended up taking more than one of these large bags home.


I couldn't see myself having the need to reuse these bags as bags, so I thought, why not repurpose them into aprons? When dismantled (rip out the stitches), one bag yields two panels, a strip that used to be the handle, and another strip that held the two panels together.


It was just a matter of cutting a panel to the shape of an apron and cutting the strips to however long the apron strings need to be. I used a serger machine (a zigzag stitch on a regular sewing machine works too) to clean up and secure the edges, and a few quick sewing stitches to attach the apron strings.


Apron made from WeLoveFine.com's bag from Star Wars Celebration VI

And there it is: a Star Wars tarp-material apron courtesy of WeLoveFine.com. (The second panel is in my "to do" pile.)